> ## Documentation Index
> Fetch the complete documentation index at: https://invopop-singapore.mintlify.site/llms.txt
> Use this file to discover all available pages before exploring further.
# Chorus Pro Guide
> Issue invoices to French public institutions with Chorus Pro.
## Introduction
In this guide, you'll learn how to issue invoices to French public institutions using [Chorus Pro](https://portail.chorus-pro.gouv.fr/).
You'll:
1. Learn about Chorus Pro and its format requirements
2. Set up Invopop workflows:
* Supplier registration workflow
* Invoice submission workflow
3. Prepare the Chorus Pro platform and create credentials
4. Register a supplier with Chorus Pro
5. Send your first invoice to a French public institution
### What is Chorus Pro?
Chorus Pro is a mandatory service provided by the French government for invoicing French public institutions. The platform allows businesses to upload invoices in multiple e-invoicing formats and track them throughout the French public administration process. All invoices to French public sector entities must be submitted through Chorus Pro.
The platform supports various e-invoicing formats including [Cross Industry Invoice (CII)](https://unece.org/trade/uncefact/e-invoice), and implements the [European Norm 16931 (EN16931)](https://ec.europa.eu/digital-building-blocks/sites/display/DIGITAL/European+Standard+and+Specifications) European standard for electronic invoicing with additional French-specific requirements.
### Understanding Chorus Pro Format Requirements
Chorus Pro accepts invoices in CII format based on the EN16931 European standard. However, it adds specific French extensions and validation requirements:
**EN16931 Standard**
The EN16931 defines the semantic data model for electronic invoices. The standard ensures interoperability across European Union (EU) member states while allowing for country-specific extensions.
**Chorus Pro Extensions**
Chorus Pro extends the base EN16931 standard with additional French requirements:
* SIRET number validation for French entities
* Specific invoice types for different purposes
* Service codes for government departments
In GOBL, these formats are handled via addons that you must add to each invoice. You'll see examples of this further below.
## Setup
Configure your Invopop Workspace for Chorus Pro invoicing.
Complete these steps:
1. Go to **Configuration** > **Apps** in the Console.
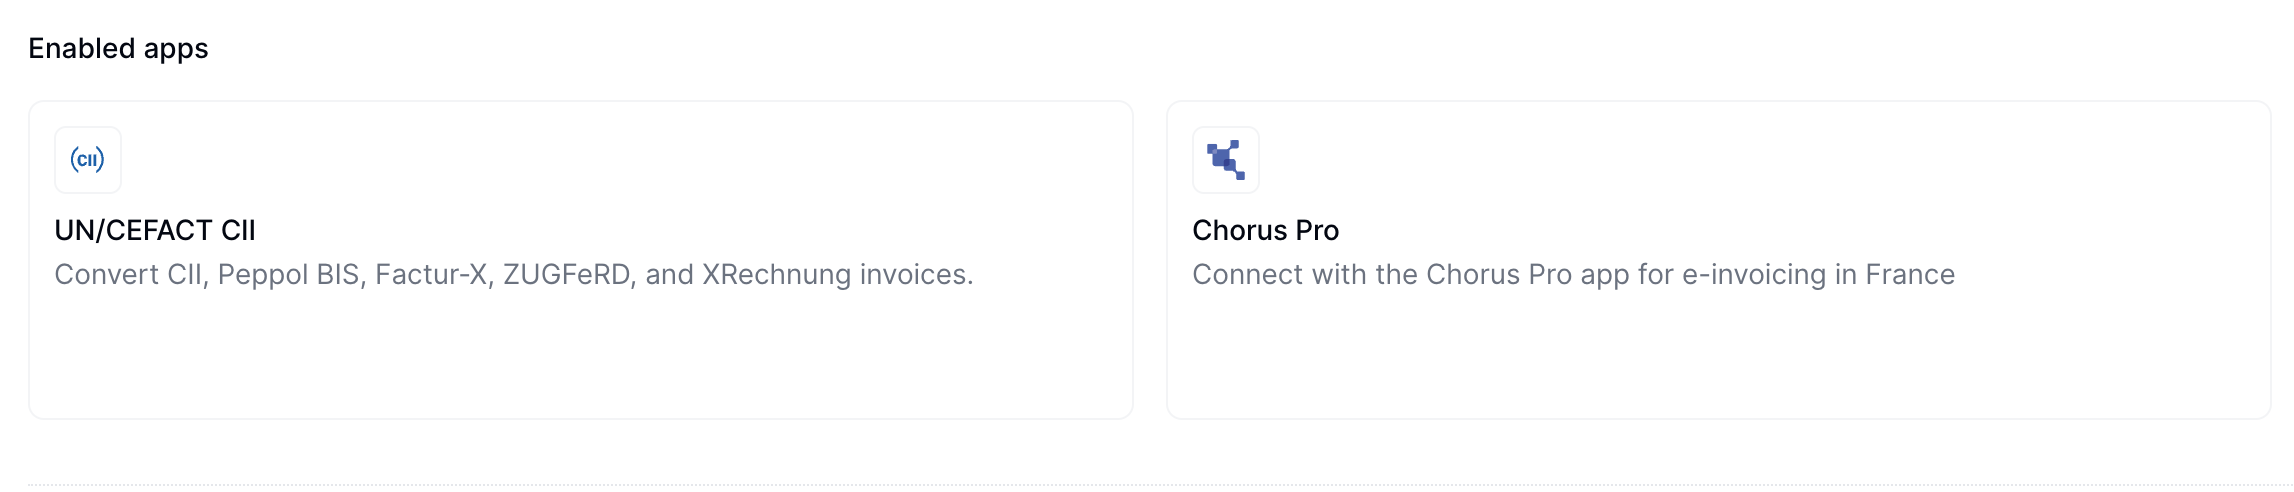
2. Find **UN/CEFACT CII** in the app list and click **Connect** to activate the app.
3. Find **Chorus Pro** in the app list and click **Connect** to activate the app.
After connecting, you'll see both UN/CEFACT CII and Chorus Pro listed in the Enabled Apps section.
 Add a new workflow to your workspace for registering suppliers. You can start with the template below.
This workflow will issue a registration request for a supplier to complete.
Copy and paste this code into a new [Empty Party workflow](https://console.invopop.com/redirect/workflows/new?template=empty-party) code view.
```json theme={"system"}
{
"name": "Register Chorus Pro Supplier",
"description": "Enables suppliers to register for Chorus Pro invoice generation",
"schema": "org/party"
"steps": [
{
"id": "49be5910-5588-11f0-8130-117b5da5a2d7",
"name": "Register a supplier for Chorus Pro",
"provider": "chorus-pro.register"
},
{
"id": "45257000-5588-11f0-8130-117b5da5a2d7",
"name": "Set State",
"provider": "silo.state",
"summary": "Set state to `processing`{.state .processing}",
"config": {
"state": "processing"
}
},
{
"id": "84f16e70-5b58-11f0-85c7-77ca7305cb3c",
"name": "Wait for Chorus Pro credentials",
"provider": "chorus-pro.wait"
},
{
"id": "4d13c5a0-5588-11f0-8130-117b5da5a2d7",
"name": "Set State",
"provider": "silo.state",
"summary": "Set state to `registered`{.state .registered}",
"config": {
"state": "registered"
}
}
],
"rescue": [
{
"id": "a6c4f090-4ced-11f0-bcdc-61b84b5eeae8",
"name": "Set State",
"provider": "silo.state",
"summary": "Set state to `error`{.state .error}",
"config": {
"state": "error"
}
}
]
}
```
Before starting, review the [workflows guide](/guides/features/workflows) to understand the general setup process.
In [Console](https://console.invopop.com), create a new workflow and choose [Empty Party workflow]() as the base. Name the workflow with a descriptive label such as "Chorus Pro Supplier Registration".
The new workflow performs a single step:
1. **Register a supplier for Chorus Pro**
Add any additional steps you need such as error handling, and save the new workflow.
Keep the workflow ID at hand as you'll need it later.
Add a new workflow to your workspace for issuing invoices. You can start with the template below.
This workflow will issue an invoice through Chorus Pro.
Copy and paste this code into a new [Empty Invoice workflow]() code view.
```json Example Chorus Pro invoice workflow with states theme={"system"}
{
"name": "Send to Chorus Pro",
"description": "Generate and send invoice to Chorus Pro using CII",
"steps": [
{
"id": "241c1b60-4cec-11f0-bcdc-61b84b5eeae8",
"name": "Set State",
"provider": "silo.state",
"summary": "Set state to `processing`{.state .processing}",
"config": {
"state": "processing"
}
},
{
"id": "0dba81f0-4ba1-11f0-a0a5-bbd7c9d8117a",
"name": "Sign Envelope",
"provider": "silo.close"
},
{
"id": "3d048690-4ba1-11f0-a0a5-bbd7c9d8117a",
"name": "Generate UN/CEFACT CII Invoice",
"provider": "cii.generate",
"summary": "Chorus Pro V1",
"config": {
"doc_type": "choruspro-v1"
}
},
{
"id": "2cd30490-4ba1-11f0-a0a5-bbd7c9d8117a",
"name": "Send an invoice to Chorus Pro",
"provider": "chorus-pro.send"
},
{
"id": "282dac00-4cec-11f0-bcdc-61b84b5eeae8",
"name": "Set State",
"provider": "silo.state",
"summary": "Set state to `sent`{.state .sent}",
"config": {
"state": "sent"
}
}
],
"rescue": [
{
"id": "2b9c6cf0-4cec-11f0-bcdc-61b84b5eeae8",
"name": "Set State",
"provider": "silo.state",
"summary": "Set state to `error`{.state .error}",
"config": {
"state": "error"
}
}
]
}
```
In [Console](https://console.invopop.com) create a new workflow and select [Empty Invoice workflow]() in the template selector. Add the following steps:
1. **Generate UN/CEFACT CII Invoice** - Select *Chorus Pro V1* as the `Invoice Output Document Type`.
2. **Send an invoice to Chorus Pro**.
In the Error Handling section, add the **Set State** action and select `Error`.
Keep the workflow ID at hand as you'll need it later.
## Chorus Pro Credentials
This section explains what suppliers need to configure within their Chorus Pro account to enable integration with Invopop.
To configure Chorus Pro, complete these steps:
1. **Create a Chorus Pro account** - Sign up for a [Chorus Pro](https://portail.chorus-pro.gouv.fr/aife_csm?id=aife_enrollment) account if you don't have one.
To test in sandbox mode, create an account in the [Chorus Pro sandbox](https://qualif.chorus-pro.gouv.fr/aife_qual). Download a CSV file with test accounts. Use one of the accounts to log in.
For more information, visit the [Chorus Pro documentation](https://portail.chorus-pro.gouv.fr/aife_documentation?sys_kb_id=8ea00d85c398ea1477c2530ed40131e2\&id=kb_article_view\&sysparm_rank=1\&sysparm_tsqueryId=66f41ea033de625056688539bd5c7bd9).
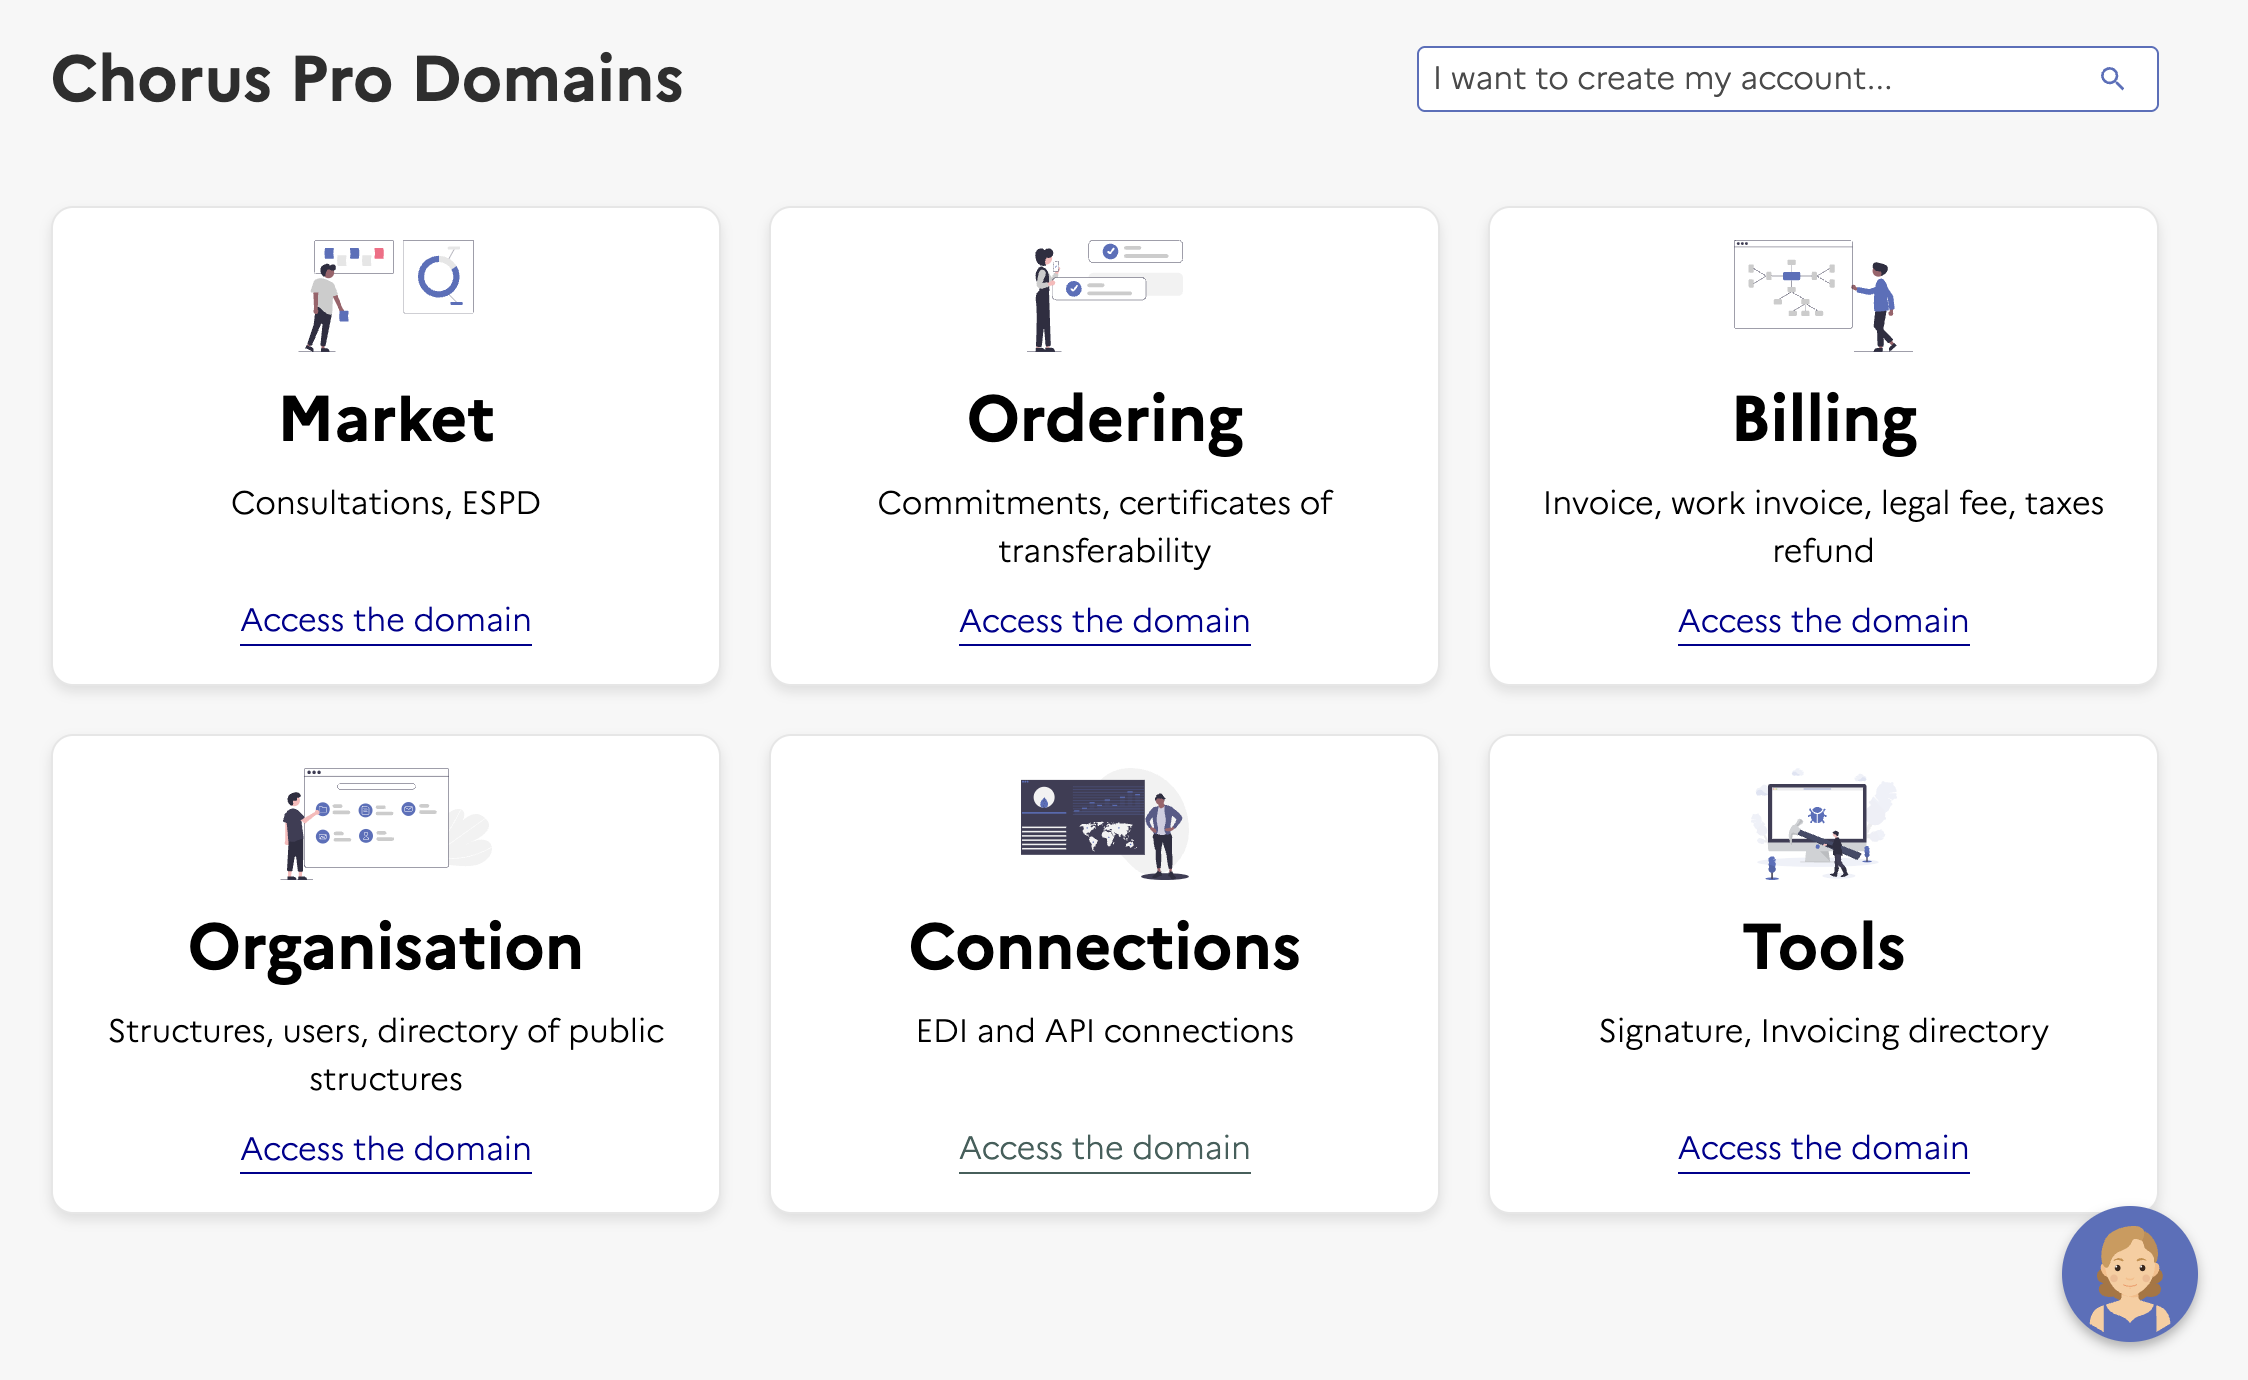
2. **Navigate to API settings** - Once logged in to your Chorus Pro account, navigate to the API configuration area:
* Go to **Domains** > **Connections** in the main menu
Add a new workflow to your workspace for registering suppliers. You can start with the template below.
This workflow will issue a registration request for a supplier to complete.
Copy and paste this code into a new [Empty Party workflow](https://console.invopop.com/redirect/workflows/new?template=empty-party) code view.
```json theme={"system"}
{
"name": "Register Chorus Pro Supplier",
"description": "Enables suppliers to register for Chorus Pro invoice generation",
"schema": "org/party"
"steps": [
{
"id": "49be5910-5588-11f0-8130-117b5da5a2d7",
"name": "Register a supplier for Chorus Pro",
"provider": "chorus-pro.register"
},
{
"id": "45257000-5588-11f0-8130-117b5da5a2d7",
"name": "Set State",
"provider": "silo.state",
"summary": "Set state to `processing`{.state .processing}",
"config": {
"state": "processing"
}
},
{
"id": "84f16e70-5b58-11f0-85c7-77ca7305cb3c",
"name": "Wait for Chorus Pro credentials",
"provider": "chorus-pro.wait"
},
{
"id": "4d13c5a0-5588-11f0-8130-117b5da5a2d7",
"name": "Set State",
"provider": "silo.state",
"summary": "Set state to `registered`{.state .registered}",
"config": {
"state": "registered"
}
}
],
"rescue": [
{
"id": "a6c4f090-4ced-11f0-bcdc-61b84b5eeae8",
"name": "Set State",
"provider": "silo.state",
"summary": "Set state to `error`{.state .error}",
"config": {
"state": "error"
}
}
]
}
```
Before starting, review the [workflows guide](/guides/features/workflows) to understand the general setup process.
In [Console](https://console.invopop.com), create a new workflow and choose [Empty Party workflow]() as the base. Name the workflow with a descriptive label such as "Chorus Pro Supplier Registration".
The new workflow performs a single step:
1. **Register a supplier for Chorus Pro**
Add any additional steps you need such as error handling, and save the new workflow.
Keep the workflow ID at hand as you'll need it later.
Add a new workflow to your workspace for issuing invoices. You can start with the template below.
This workflow will issue an invoice through Chorus Pro.
Copy and paste this code into a new [Empty Invoice workflow]() code view.
```json Example Chorus Pro invoice workflow with states theme={"system"}
{
"name": "Send to Chorus Pro",
"description": "Generate and send invoice to Chorus Pro using CII",
"steps": [
{
"id": "241c1b60-4cec-11f0-bcdc-61b84b5eeae8",
"name": "Set State",
"provider": "silo.state",
"summary": "Set state to `processing`{.state .processing}",
"config": {
"state": "processing"
}
},
{
"id": "0dba81f0-4ba1-11f0-a0a5-bbd7c9d8117a",
"name": "Sign Envelope",
"provider": "silo.close"
},
{
"id": "3d048690-4ba1-11f0-a0a5-bbd7c9d8117a",
"name": "Generate UN/CEFACT CII Invoice",
"provider": "cii.generate",
"summary": "Chorus Pro V1",
"config": {
"doc_type": "choruspro-v1"
}
},
{
"id": "2cd30490-4ba1-11f0-a0a5-bbd7c9d8117a",
"name": "Send an invoice to Chorus Pro",
"provider": "chorus-pro.send"
},
{
"id": "282dac00-4cec-11f0-bcdc-61b84b5eeae8",
"name": "Set State",
"provider": "silo.state",
"summary": "Set state to `sent`{.state .sent}",
"config": {
"state": "sent"
}
}
],
"rescue": [
{
"id": "2b9c6cf0-4cec-11f0-bcdc-61b84b5eeae8",
"name": "Set State",
"provider": "silo.state",
"summary": "Set state to `error`{.state .error}",
"config": {
"state": "error"
}
}
]
}
```
In [Console](https://console.invopop.com) create a new workflow and select [Empty Invoice workflow]() in the template selector. Add the following steps:
1. **Generate UN/CEFACT CII Invoice** - Select *Chorus Pro V1* as the `Invoice Output Document Type`.
2. **Send an invoice to Chorus Pro**.
In the Error Handling section, add the **Set State** action and select `Error`.
Keep the workflow ID at hand as you'll need it later.
## Chorus Pro Credentials
This section explains what suppliers need to configure within their Chorus Pro account to enable integration with Invopop.
To configure Chorus Pro, complete these steps:
1. **Create a Chorus Pro account** - Sign up for a [Chorus Pro](https://portail.chorus-pro.gouv.fr/aife_csm?id=aife_enrollment) account if you don't have one.
To test in sandbox mode, create an account in the [Chorus Pro sandbox](https://qualif.chorus-pro.gouv.fr/aife_qual). Download a CSV file with test accounts. Use one of the accounts to log in.
For more information, visit the [Chorus Pro documentation](https://portail.chorus-pro.gouv.fr/aife_documentation?sys_kb_id=8ea00d85c398ea1477c2530ed40131e2\&id=kb_article_view\&sysparm_rank=1\&sysparm_tsqueryId=66f41ea033de625056688539bd5c7bd9).
2. **Navigate to API settings** - Once logged in to your Chorus Pro account, navigate to the API configuration area:
* Go to **Domains** > **Connections** in the main menu
 * Click **Access Service** in the Technical Account section (bottom left)
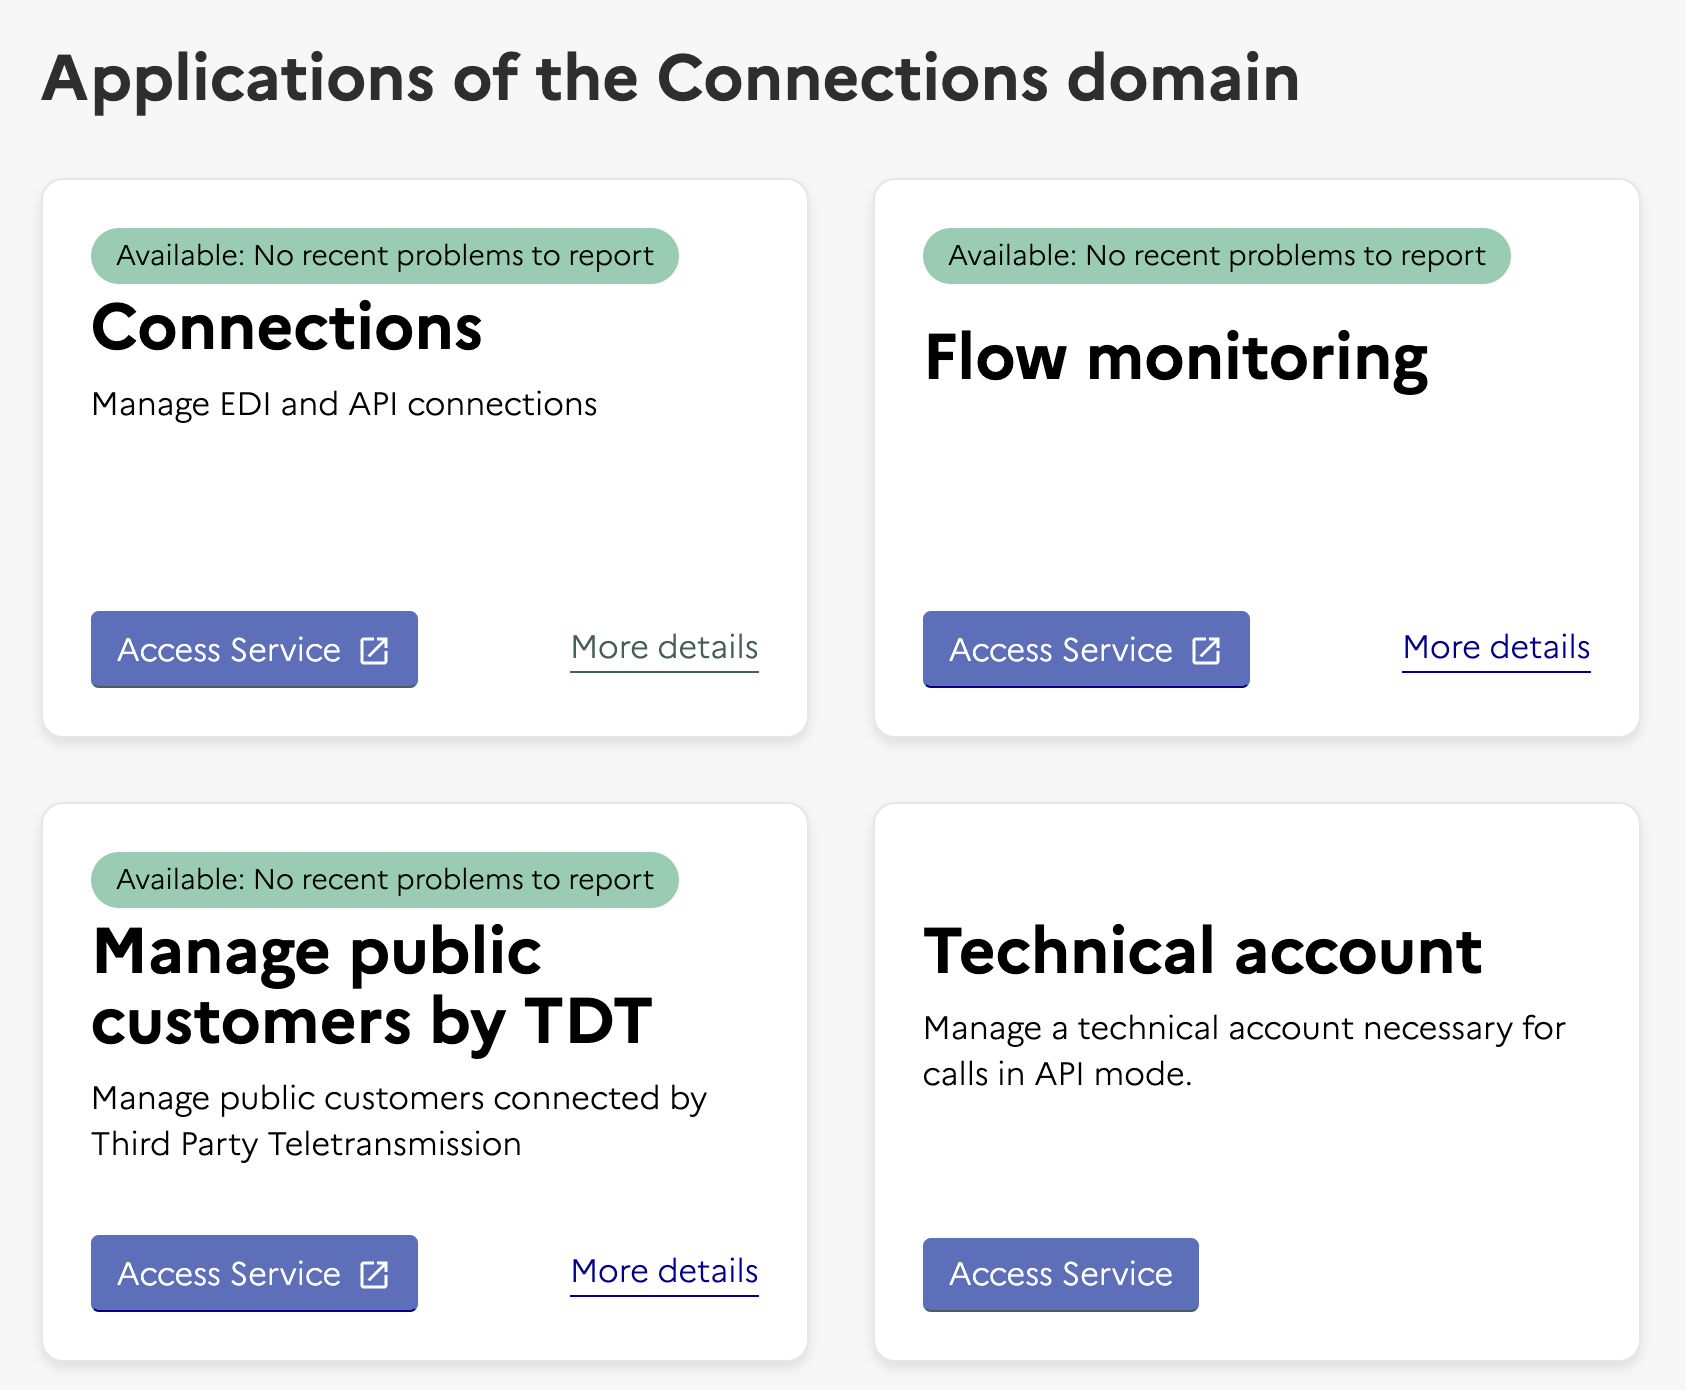 This opens a new page where you can manage your technical accounts.
3. **Create technical account** - Set up the technical account credentials:
* This opens a form to create a technical account:
* Set the type of request to **Creation of a technical account**
* Select your company in the company field
* This creates a login and password - **copy these credentials as you'll need them when registering with Invopop**
This opens a new page where you can manage your technical accounts.
3. **Create technical account** - Set up the technical account credentials:
* This opens a form to create a technical account:
* Set the type of request to **Creation of a technical account**
* Select your company in the company field
* This creates a login and password - **copy these credentials as you'll need them when registering with Invopop**
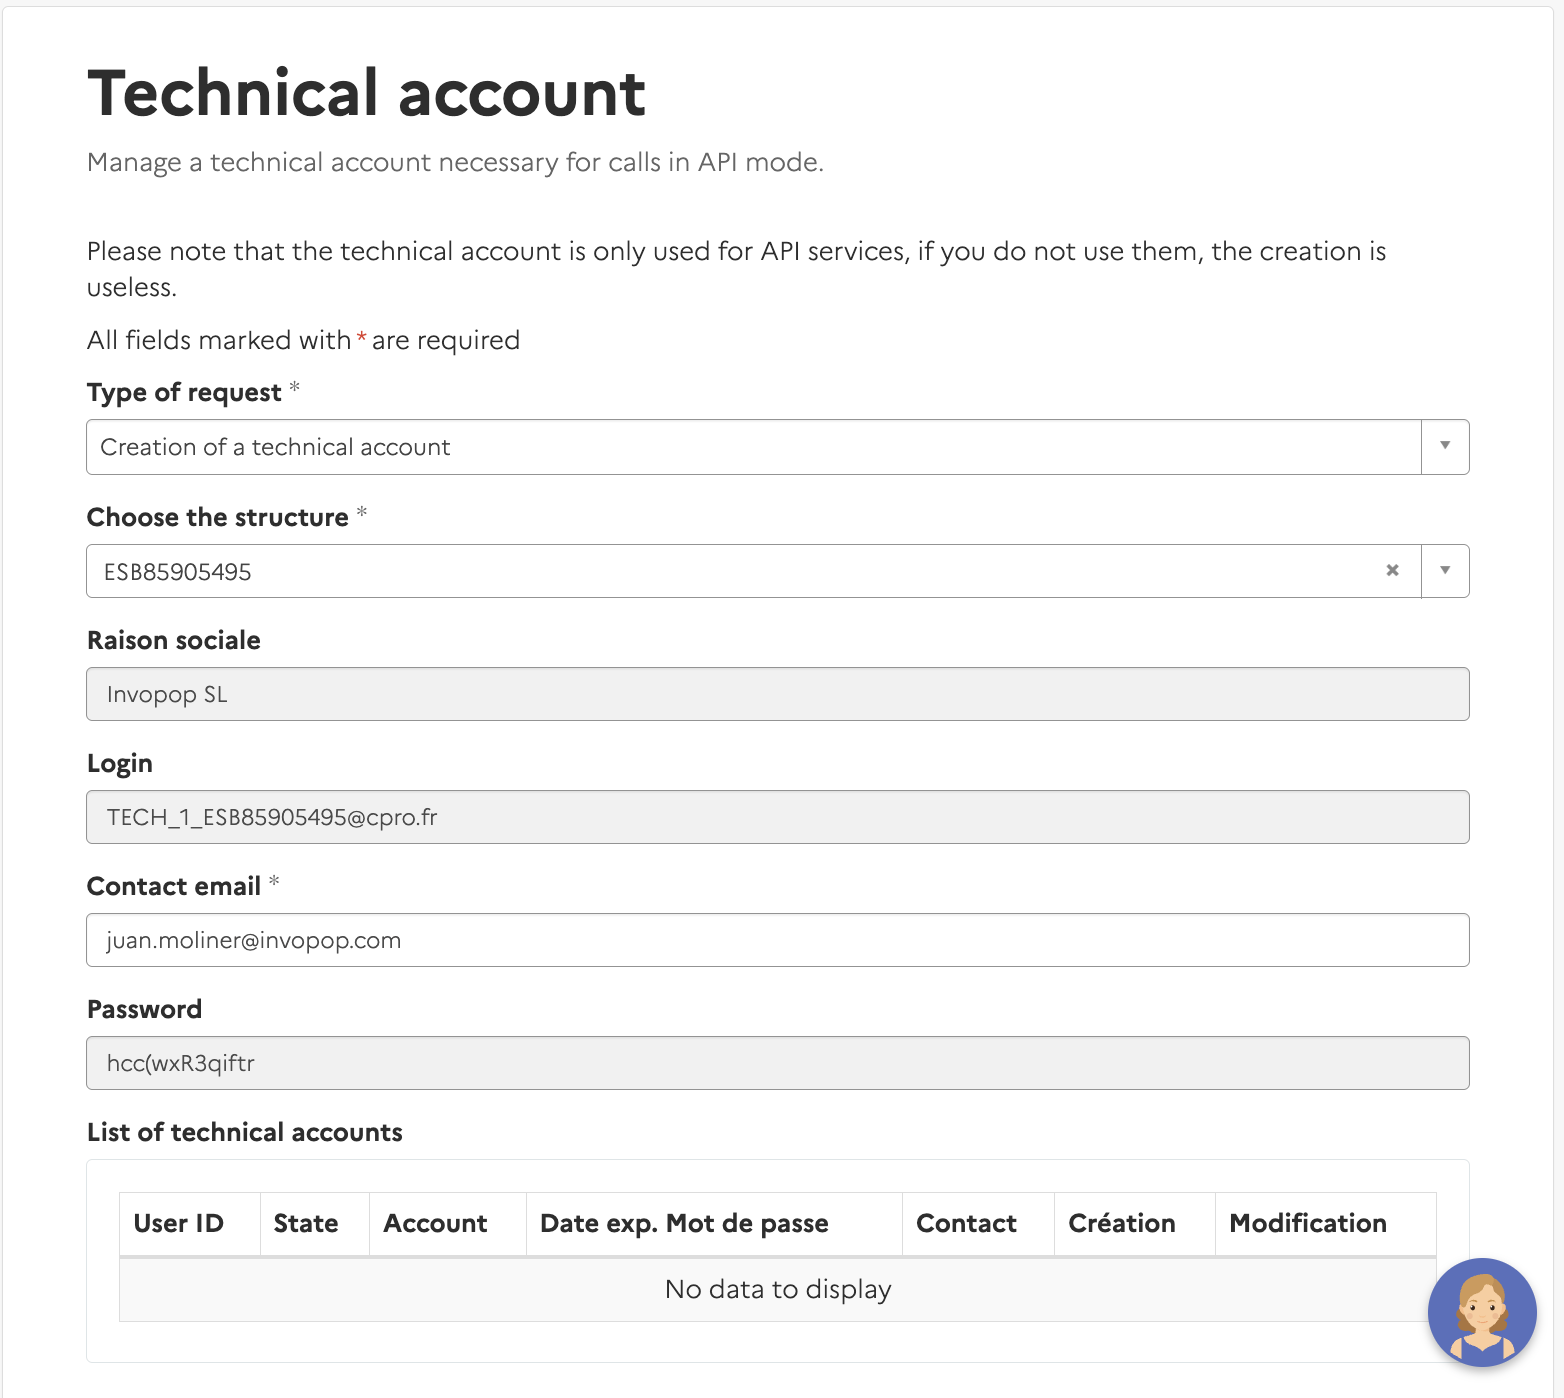 * Click **Submit** to complete the setup
Return to Invopop for the next steps.
## Running
Now you'll learn how to register a supplier and issue Chorus Pro invoices:
### Register a Supplier
Now that you have a technical account, register a supplier with Chorus Pro.
Use the [Create an entry](/api-ref/silo/entries/create-an-entry-put) endpoint to upload a new supplier. Include a [party](https://docs.gobl.org/draft-0/org/party) object in the [data](/api-ref/silo/entries/create-an-entry-put#body-data) field. For this step, you only need the VAT number.
After successful upload, you'll see the supplier in the **Contacts** section with status `Empty`.
* Click **Submit** to complete the setup
Return to Invopop for the next steps.
## Running
Now you'll learn how to register a supplier and issue Chorus Pro invoices:
### Register a Supplier
Now that you have a technical account, register a supplier with Chorus Pro.
Use the [Create an entry](/api-ref/silo/entries/create-an-entry-put) endpoint to upload a new supplier. Include a [party](https://docs.gobl.org/draft-0/org/party) object in the [data](/api-ref/silo/entries/create-an-entry-put#body-data) field. For this step, you only need the VAT number.
After successful upload, you'll see the supplier in the **Contacts** section with status `Empty`.
 Send the supplier to the registration workflow using the [Create a job](/api-ref/transform/jobs/create-a-job-post) endpoint. Use:
* The supplier's silo entry UUID from the previous step
* The Supplier Registration workflow ID from the [Setup](#setup) section
This workflow generates a unique URL for the supplier to access and complete the registration process. The URL is stored in the supplier's metadata.
Send the supplier to the registration workflow using the [Create a job](/api-ref/transform/jobs/create-a-job-post) endpoint. Use:
* The supplier's silo entry UUID from the previous step
* The Supplier Registration workflow ID from the [Setup](#setup) section
This workflow generates a unique URL for the supplier to access and complete the registration process. The URL is stored in the supplier's metadata.
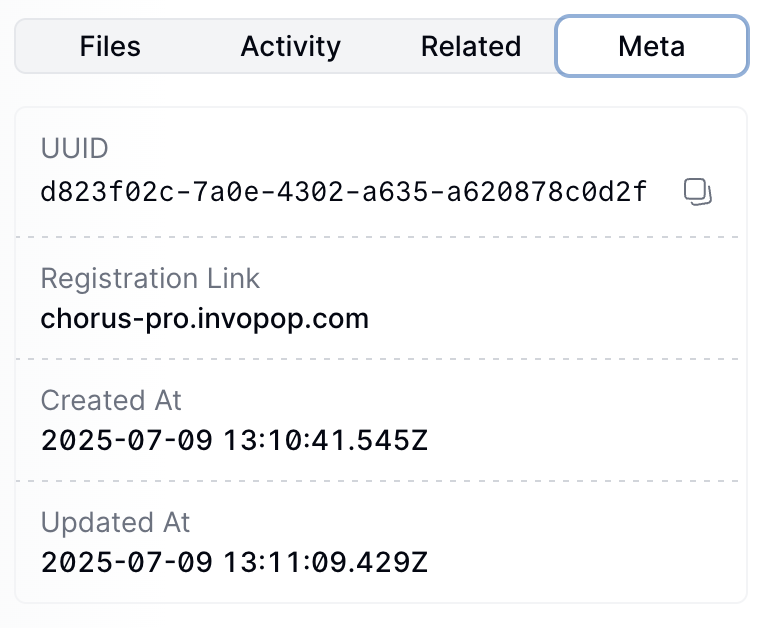 The workflow stays in progress until the supplier completes the registration process. The supplier must access the link and add the credentials they created previously.
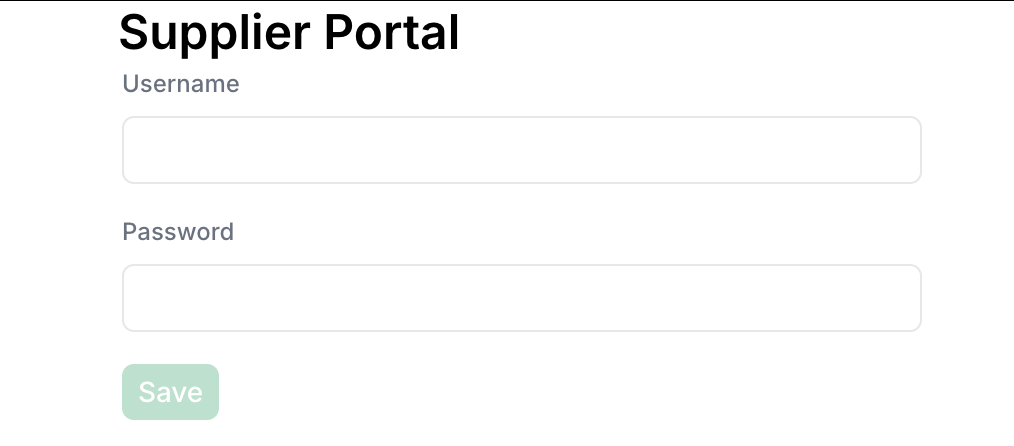 The supplier's status will change to `Registered` when authentication is complete.
You can fill the form via API by sending a PUT request to the registration link. The payload should be a JSON object with the following fields:
* `username` (string): The supplier's Chorus Pro username.
* `password` (string): The supplier's Chorus Pro password.
### Send an Invoice
Once a supplier is registered, you can send invoices to French public institutions through Chorus Pro.
Use the [Create an entry](/api-ref/silo/entries/create-an-entry-put) endpoint to create a new invoice. Include an [invoice](https://docs.gobl.org/draft-0/bill/invoice) object in the [data](/api-ref/silo/entries/create-an-entry-put#body-data) field.
```json Chorus Pro B2G Invoice theme={"system"}
{
"$schema": "https://gobl.org/draft-0/envelope",
"head": {
"uuid": "8a51fd30-2a27-11ee-be56-0242ac120002",
"dig": {
"alg": "sha256",
"val": "4dde30dddc3c585d881c399680842e7167a5619457fc27cf84ca48c22b41af45"
}
},
"doc": {
"$schema": "https://gobl.org/draft-0/bill/invoice",
"$regime": "FR",
"$addons": [
"eu-en16931-v2017",
"fr-choruspro-v1"
],
"uuid": "019783e7-33b1-7000-a1a5-6139e214b447",
"type": "standard",
"series": "SAMPLE",
"code": "2345",
"issue_date": "2025-06-18",
"currency": "EUR",
"tax": {
"ext": {
"fr-choruspro-framework": "A2",
"untdid-document-type": "380"
}
},
"supplier": {
"name": "Provide One Inc.",
"tax_id": {
"country": "FR",
"code": "43498927917"
},
"identities": [
{
"type": "SIRET",
"code": "49892791768734"
}
],
"addresses": [
{
"num": "42",
"street": "Calle Pradillo",
"locality": "Madrid",
"region": "Madrid",
"code": "28002",
"country": "ES"
}
],
"emails": [
{
"addr": "billing@example.com"
}
],
"ext": {
"fr-choruspro-scheme": "1"
}
},
"customer": {
"name": "Sample Consumer",
"tax_id": {
"country": "FR",
"code": "39356000000"
},
"identities": [
{
"type": "SIRET",
"code": "35600000012345"
}
],
"addresses": [
{
"num": "1",
"street": "Rue Sundacsakn",
"locality": "Saint-Germain-En-Laye",
"code": "75050",
"country": "FR"
}
],
"emails": [
{
"addr": "email@sample.com"
}
],
"ext": {
"fr-choruspro-scheme": "1"
}
},
"lines": [
{
"i": 1,
"quantity": "20",
"item": {
"name": "Development services",
"price": "90.00",
"unit": "h"
},
"sum": "1800.00",
"discounts": [
{
"reason": "Special discount",
"percent": "10%",
"amount": "180.00"
}
],
"taxes": [
{
"cat": "VAT",
"rate": "standard",
"percent": "20%",
"ext": {
"untdid-tax-category": "S"
}
}
],
"total": "1620.00"
}
],
"payment": {
"advances": [
{
"description": "Paid in full",
"percent": "100%",
"amount": "1944.00"
}
],
"instructions": {
"key": "card",
"card": {},
"ext": {
"untdid-payment-means": "48"
}
}
},
"totals": {
"sum": "1620.00",
"total": "1620.00",
"taxes": {
"categories": [
{
"code": "VAT",
"rates": [
{
"key": "standard",
"ext": {
"untdid-tax-category": "S"
},
"base": "1620.00",
"percent": "20%",
"amount": "324.00"
}
],
"amount": "324.00"
}
],
"sum": "324.00"
},
"tax": "324.00",
"total_with_tax": "1944.00",
"payable": "1944.00",
"advance": "1944.00",
"due": "0.00"
}
}
}
```
Review the example above. Notice that you need both the `eu-en16931-v2017` and the `fr-choruspro-v1` addon. These addons enable all the necessary validations in your GOBL invoice.
Send the invoice to Chorus Pro using the [Create a job](/api-ref/transform/jobs/create-a-job-post) endpoint. Use:
* The invoice's silo entry UUID from the previous step
* The Chorus Pro Invoice workflow ID from the [Setup](#setup) section
The system generates a CII XML file with Chorus Pro extensions and submits it to the platform.
The supplier's status will change to `Registered` when authentication is complete.
You can fill the form via API by sending a PUT request to the registration link. The payload should be a JSON object with the following fields:
* `username` (string): The supplier's Chorus Pro username.
* `password` (string): The supplier's Chorus Pro password.
### Send an Invoice
Once a supplier is registered, you can send invoices to French public institutions through Chorus Pro.
Use the [Create an entry](/api-ref/silo/entries/create-an-entry-put) endpoint to create a new invoice. Include an [invoice](https://docs.gobl.org/draft-0/bill/invoice) object in the [data](/api-ref/silo/entries/create-an-entry-put#body-data) field.
```json Chorus Pro B2G Invoice theme={"system"}
{
"$schema": "https://gobl.org/draft-0/envelope",
"head": {
"uuid": "8a51fd30-2a27-11ee-be56-0242ac120002",
"dig": {
"alg": "sha256",
"val": "4dde30dddc3c585d881c399680842e7167a5619457fc27cf84ca48c22b41af45"
}
},
"doc": {
"$schema": "https://gobl.org/draft-0/bill/invoice",
"$regime": "FR",
"$addons": [
"eu-en16931-v2017",
"fr-choruspro-v1"
],
"uuid": "019783e7-33b1-7000-a1a5-6139e214b447",
"type": "standard",
"series": "SAMPLE",
"code": "2345",
"issue_date": "2025-06-18",
"currency": "EUR",
"tax": {
"ext": {
"fr-choruspro-framework": "A2",
"untdid-document-type": "380"
}
},
"supplier": {
"name": "Provide One Inc.",
"tax_id": {
"country": "FR",
"code": "43498927917"
},
"identities": [
{
"type": "SIRET",
"code": "49892791768734"
}
],
"addresses": [
{
"num": "42",
"street": "Calle Pradillo",
"locality": "Madrid",
"region": "Madrid",
"code": "28002",
"country": "ES"
}
],
"emails": [
{
"addr": "billing@example.com"
}
],
"ext": {
"fr-choruspro-scheme": "1"
}
},
"customer": {
"name": "Sample Consumer",
"tax_id": {
"country": "FR",
"code": "39356000000"
},
"identities": [
{
"type": "SIRET",
"code": "35600000012345"
}
],
"addresses": [
{
"num": "1",
"street": "Rue Sundacsakn",
"locality": "Saint-Germain-En-Laye",
"code": "75050",
"country": "FR"
}
],
"emails": [
{
"addr": "email@sample.com"
}
],
"ext": {
"fr-choruspro-scheme": "1"
}
},
"lines": [
{
"i": 1,
"quantity": "20",
"item": {
"name": "Development services",
"price": "90.00",
"unit": "h"
},
"sum": "1800.00",
"discounts": [
{
"reason": "Special discount",
"percent": "10%",
"amount": "180.00"
}
],
"taxes": [
{
"cat": "VAT",
"rate": "standard",
"percent": "20%",
"ext": {
"untdid-tax-category": "S"
}
}
],
"total": "1620.00"
}
],
"payment": {
"advances": [
{
"description": "Paid in full",
"percent": "100%",
"amount": "1944.00"
}
],
"instructions": {
"key": "card",
"card": {},
"ext": {
"untdid-payment-means": "48"
}
}
},
"totals": {
"sum": "1620.00",
"total": "1620.00",
"taxes": {
"categories": [
{
"code": "VAT",
"rates": [
{
"key": "standard",
"ext": {
"untdid-tax-category": "S"
},
"base": "1620.00",
"percent": "20%",
"amount": "324.00"
}
],
"amount": "324.00"
}
],
"sum": "324.00"
},
"tax": "324.00",
"total_with_tax": "1944.00",
"payable": "1944.00",
"advance": "1944.00",
"due": "0.00"
}
}
}
```
Review the example above. Notice that you need both the `eu-en16931-v2017` and the `fr-choruspro-v1` addon. These addons enable all the necessary validations in your GOBL invoice.
Send the invoice to Chorus Pro using the [Create a job](/api-ref/transform/jobs/create-a-job-post) endpoint. Use:
* The invoice's silo entry UUID from the previous step
* The Chorus Pro Invoice workflow ID from the [Setup](#setup) section
The system generates a CII XML file with Chorus Pro extensions and submits it to the platform.
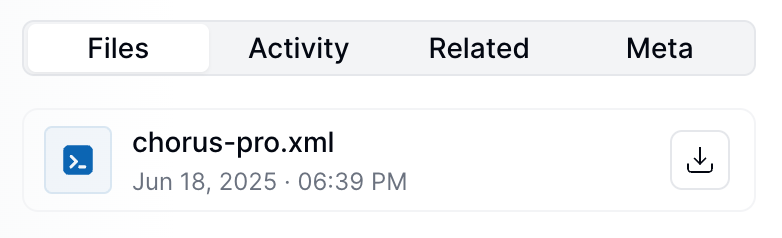 After submission, track your invoice in [Chorus Pro](https://cpro.chorus-pro.gouv.fr/cpp/rechercheFacturesEmises) using the invoice identifier (series plus code).
Chorus Pro allows document modifications after submission. If a document is rejected or contains errors, update the GOBL details and resubmit to the same workflow until the document is accepted.
Once accepted, do not modify the invoice.
The invoice identifier in Chorus Pro corresponds to your GOBL invoice series and code combined. This identifier helps you locate and track invoices across both systems.
## FAQ
Chorus Pro primarily supports CII format based on EN16931. Invopop currently focuses on CII with plans to add additional formats in the future.
French businesses need a SIRET number. Foreign businesses can use their local tax identifier, but should verify acceptance with the receiving French institution.
Yes, you can modify and resubmit invoices until the receiving institution accepts them. Once accepted, invoices become locked and cannot be modified.
Use your GOBL invoice series and code combined as the invoice identifier in the Chorus Pro portal to locate your submitted invoices.
Ensure the supplier has a valid Chorus Pro account and provided correct credentials. Contact support if registration workflow issues persist.
Chorus Pro has specific file size and format requirements. Invopop handles these automatically when generating CII XML files from your GOBL invoices.
After submission, track your invoice in [Chorus Pro](https://cpro.chorus-pro.gouv.fr/cpp/rechercheFacturesEmises) using the invoice identifier (series plus code).
Chorus Pro allows document modifications after submission. If a document is rejected or contains errors, update the GOBL details and resubmit to the same workflow until the document is accepted.
Once accepted, do not modify the invoice.
The invoice identifier in Chorus Pro corresponds to your GOBL invoice series and code combined. This identifier helps you locate and track invoices across both systems.
## FAQ
Chorus Pro primarily supports CII format based on EN16931. Invopop currently focuses on CII with plans to add additional formats in the future.
French businesses need a SIRET number. Foreign businesses can use their local tax identifier, but should verify acceptance with the receiving French institution.
Yes, you can modify and resubmit invoices until the receiving institution accepts them. Once accepted, invoices become locked and cannot be modified.
Use your GOBL invoice series and code combined as the invoice identifier in the Chorus Pro portal to locate your submitted invoices.
Ensure the supplier has a valid Chorus Pro account and provided correct credentials. Contact support if registration workflow issues persist.
Chorus Pro has specific file size and format requirements. Invopop handles these automatically when generating CII XML files from your GOBL invoices.