> ## Documentation Index
> Fetch the complete documentation index at: https://invopop-singapore.mintlify.site/llms.txt
> Use this file to discover all available pages before exploring further.
# VERI*FACTU Supplier onboarding
> Create and register suppliers in Spain with VERI*FACTU.
## Introduction
The Spanish Tax Agency ([AEAT](https://sede.agenciatributaria.gob.es)) requires that companies formally authorize Invopop to issue invoices on their behalf. To comply with this regulation, the supplier's legal representative must sign an agreement granting Invopop the necessary consent to generate and manage invoices in their name. This signed authorization ensures that all invoicing activities carried out by Invopop are legally valid and recognized by the AEAT.
For this process, the supplier can sign the agreement PDF with a valid [digital certificate](https://www.sede.fnmt.gob.es/certificados/persona-fisica), such as one issued by the FNMT, or a handwritten signature with a company stamp (*sello de empresa*), in which case the user must provide a valid ID such as DNI, NIE or passport.
## Set-up
1. Go to **Configuration** → **Apps** in the [Console](https://console.invopop.com).
2. Find **VERI\*FACTU Spain** in the app list.
3. Click **Connect** to activate the app.
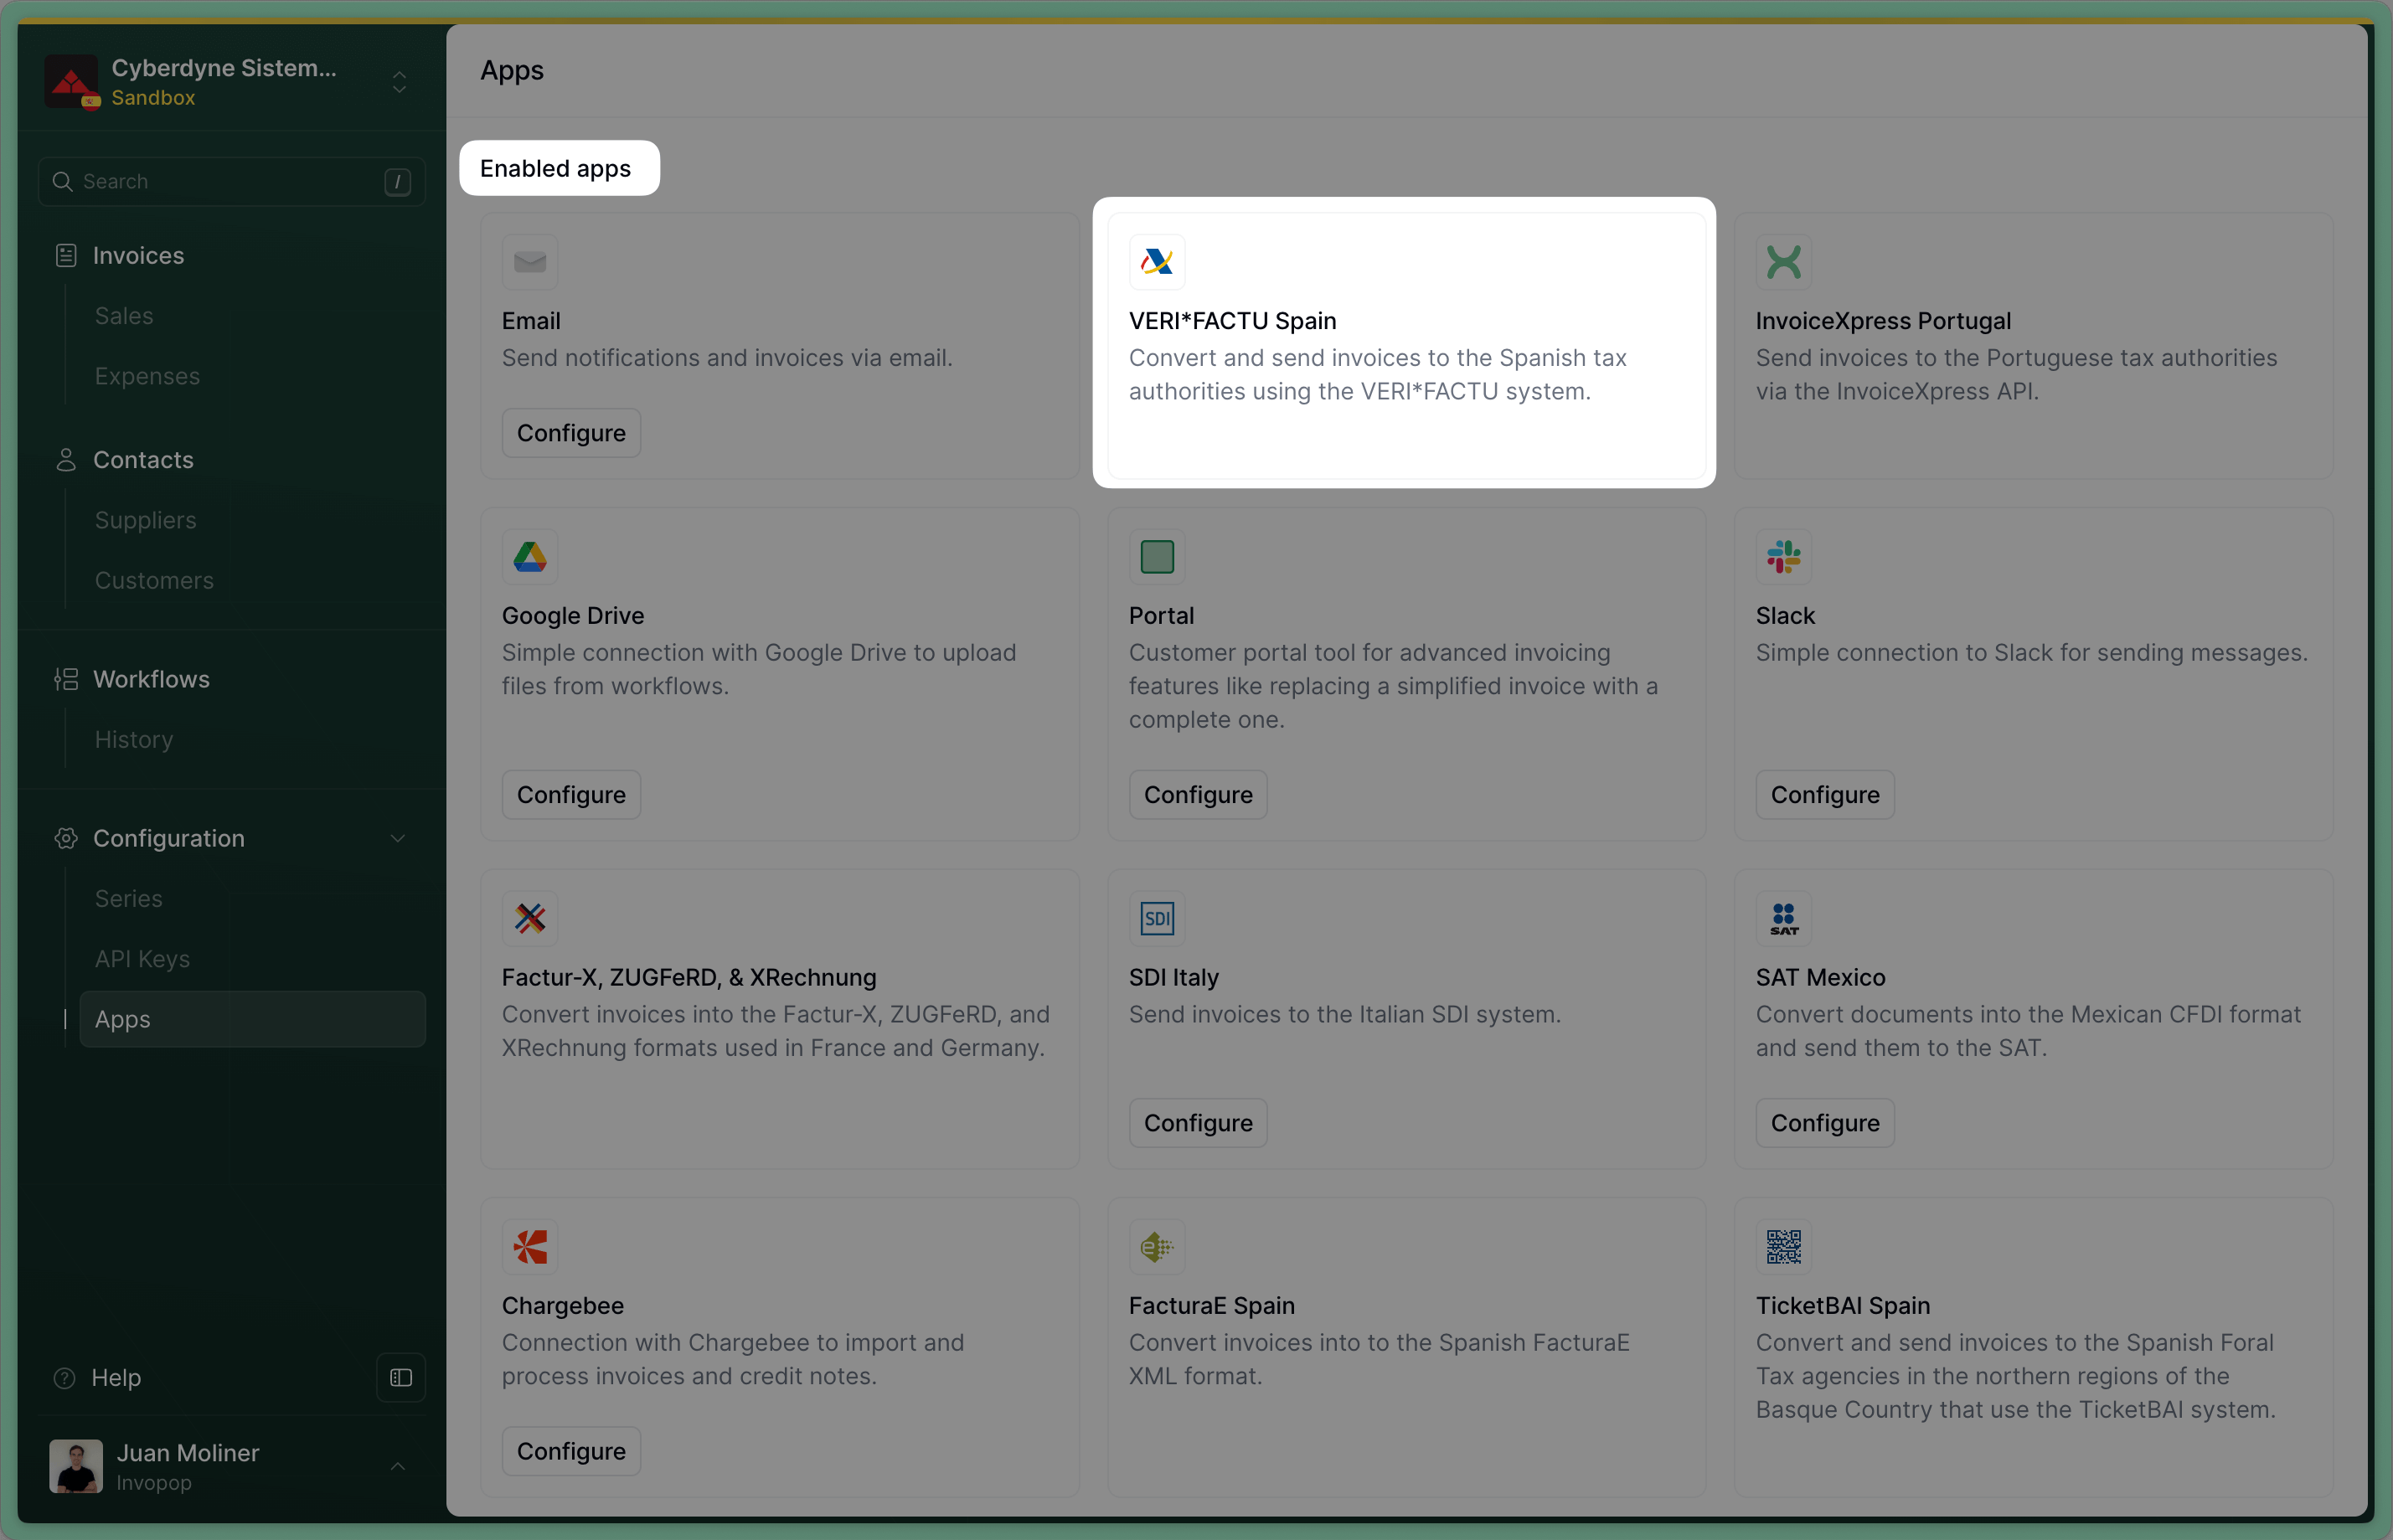 After connecting, you'll see VERI\*FACTU listed in the Enabled Apps section.
Create a new workflow in your workspace for registering suppliers. You should start with the template below:
This workflow will issue a registration request for a supplier to complete.
Copy and paste into a new [Empty Party workflow](https://console.invopop.com/redirect/workflows/new?template=empty-party) code view.
```json Example VERI*FACTU supplier registration theme={"system"}
{
"name": "VERI*FACTU supplier registration",
"description": "Enables suppliers to register for VERI*FACTU invoice generation",
"schema": "org/party",
"steps": [
{
"id": "52f5d190-831c-11f0-9ba3-7d4deb7b9d0e",
"name": "Register supplier",
"provider": "verifactu.register"
},
{
"id": "5bfc9c10-831c-11f0-9ba3-7d4deb7b9d0e",
"name": "Set State",
"provider": "silo.state",
"summary": "Set state to `processing`{.state .processing}",
"config": {
"state": "processing"
}
},
{
"id": "627c94a0-831c-11f0-9ba3-7d4deb7b9d0e",
"name": "Wait for supplier registration",
"provider": "verifactu.wait.upload"
},
{
"id": "6f84ea30-831c-11f0-9ba3-7d4deb7b9d0e",
"name": "Set State",
"provider": "silo.state",
"summary": "Set state to `registered`{.state .registered}",
"config": {
"state": "registered"
}
},
{
"id": "78dabf10-831c-11f0-9ba3-7d4deb7b9d0e",
"name": "Wait for supplier approval",
"provider": "verifactu.wait.approval"
}
],
"rescue": [
{
"id": "846415c0-831c-11f0-9ba3-7d4deb7b9d0e",
"name": "Set State",
"provider": "silo.state",
"summary": "Set state to `error`{.state .error}",
"config": {
"state": "error"
}
}
]
}
```
Before starting, review the [workflows guide](/guides/features/workflows) to understand the general setup process.
In [Console](https://console.invopop.com), create a new workflow and choose [Empty Party workflow](https://console.invopop.com/redirect/workflows/new?template=empty-party) as the base. Then name the workflow with a descriptive label such as "VERI\*FACTU Supplier Registration".
The new workflow will need to perform the following steps:
1. **Register supplier** - Sends an email to the supplier with a registration link.
2. **Set State** — select "Processing".
3. **Wait for supplier registration** - Configure the wait time (in days) for the supplier to complete the registration form, sign agreements and attach the required documentation.
4. **Set State** — select "Registered".
5. **Wait for supplier approval** - Invopop will validate the provided supplier documentation in less than 72 hours. If rejected it will generate an error and block the supplier from issuing invoices.
6. **Set State** — select "Registered"
Finally, in the Error Handling area, add the **Set State** action and select `Error`.
Add any additional steps you may need, and save the new workflow.
## How VERI\*FACTU supplier registration works
The process is best explained looking at the workflow steps:
After connecting, you'll see VERI\*FACTU listed in the Enabled Apps section.
Create a new workflow in your workspace for registering suppliers. You should start with the template below:
This workflow will issue a registration request for a supplier to complete.
Copy and paste into a new [Empty Party workflow](https://console.invopop.com/redirect/workflows/new?template=empty-party) code view.
```json Example VERI*FACTU supplier registration theme={"system"}
{
"name": "VERI*FACTU supplier registration",
"description": "Enables suppliers to register for VERI*FACTU invoice generation",
"schema": "org/party",
"steps": [
{
"id": "52f5d190-831c-11f0-9ba3-7d4deb7b9d0e",
"name": "Register supplier",
"provider": "verifactu.register"
},
{
"id": "5bfc9c10-831c-11f0-9ba3-7d4deb7b9d0e",
"name": "Set State",
"provider": "silo.state",
"summary": "Set state to `processing`{.state .processing}",
"config": {
"state": "processing"
}
},
{
"id": "627c94a0-831c-11f0-9ba3-7d4deb7b9d0e",
"name": "Wait for supplier registration",
"provider": "verifactu.wait.upload"
},
{
"id": "6f84ea30-831c-11f0-9ba3-7d4deb7b9d0e",
"name": "Set State",
"provider": "silo.state",
"summary": "Set state to `registered`{.state .registered}",
"config": {
"state": "registered"
}
},
{
"id": "78dabf10-831c-11f0-9ba3-7d4deb7b9d0e",
"name": "Wait for supplier approval",
"provider": "verifactu.wait.approval"
}
],
"rescue": [
{
"id": "846415c0-831c-11f0-9ba3-7d4deb7b9d0e",
"name": "Set State",
"provider": "silo.state",
"summary": "Set state to `error`{.state .error}",
"config": {
"state": "error"
}
}
]
}
```
Before starting, review the [workflows guide](/guides/features/workflows) to understand the general setup process.
In [Console](https://console.invopop.com), create a new workflow and choose [Empty Party workflow](https://console.invopop.com/redirect/workflows/new?template=empty-party) as the base. Then name the workflow with a descriptive label such as "VERI\*FACTU Supplier Registration".
The new workflow will need to perform the following steps:
1. **Register supplier** - Sends an email to the supplier with a registration link.
2. **Set State** — select "Processing".
3. **Wait for supplier registration** - Configure the wait time (in days) for the supplier to complete the registration form, sign agreements and attach the required documentation.
4. **Set State** — select "Registered".
5. **Wait for supplier approval** - Invopop will validate the provided supplier documentation in less than 72 hours. If rejected it will generate an error and block the supplier from issuing invoices.
6. **Set State** — select "Registered"
Finally, in the Error Handling area, add the **Set State** action and select `Error`.
Add any additional steps you may need, and save the new workflow.
## How VERI\*FACTU supplier registration works
The process is best explained looking at the workflow steps:
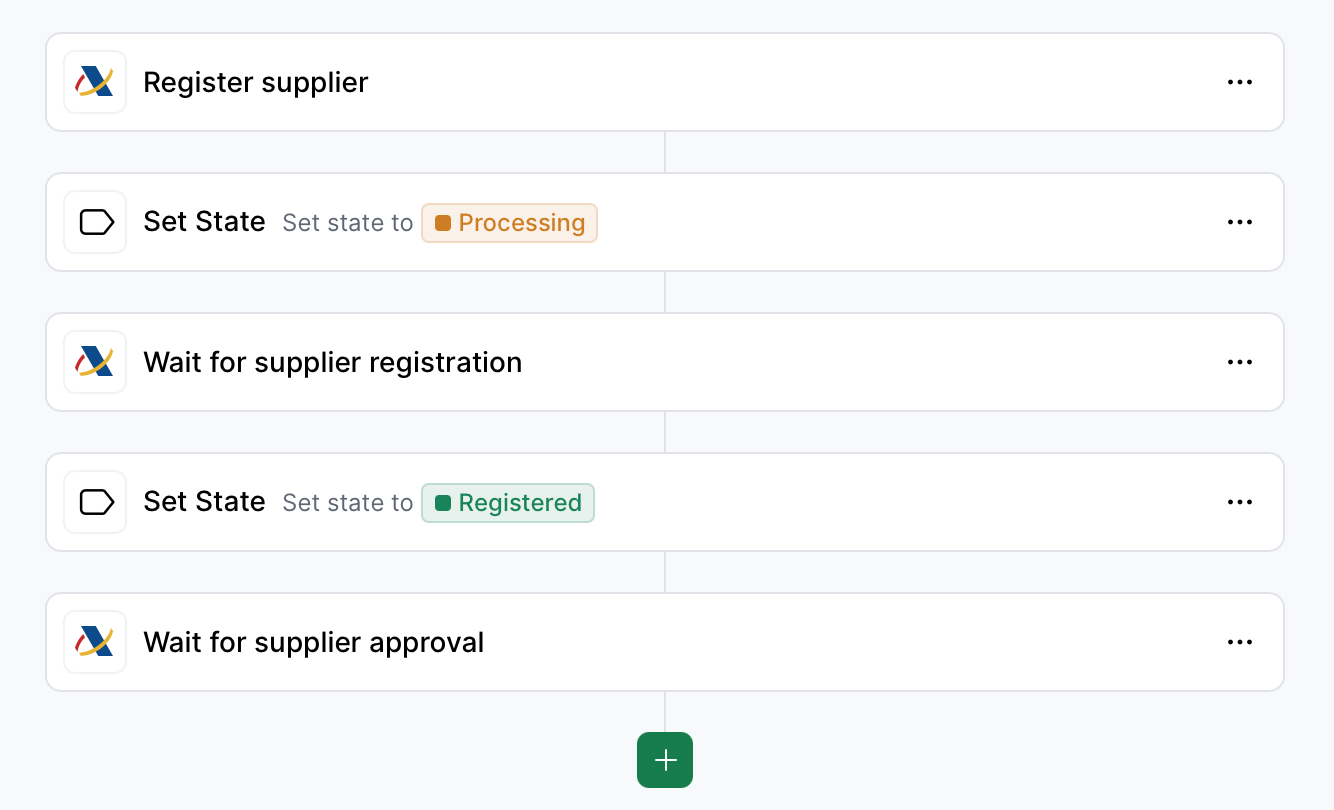 1. **Register supplier** will generate a unique URL and add it into a `url` key value within the `meta` property. You would add a webhook after this step to notify the supplier.
2. **Set State to Processing** labels the silo entry so you know it's in process of registration.
3. **Wait for supplier registration** waits for the supplier to upload the required documents (signed agreement and ID). The supplier will be entitled to issue invoices through VERI\*FACTU immediately after the documents are uploaded.
4. **Set State to Registered** labels the silo entry so you know registration is complete.
5. **Wait for supplier approval** In live environments, Invopop will review the documents provided by the supplier in less than 72 hours. In sandbox, you can configure the workflow step to accept or reject providers. Open rejection the workflow will error with a `KO` and the reason for rejection can be reviewed in the Supplier or in the executed job. The supplier's invoice issuing entitlement will be revoked immediately.
In sandbox "Wait for supplier approval" can be configured to accept or reject suppliers. Re-running the workflow will not change the approval outcome, the supplier must be unregistered first.
## Register a Supplier
Suppliers need to provide the following documents for Invopop to issue invoices on their behalf:
1. A signed [direct representation agreement](https://sede.agenciatributaria.gob.es/static_files/Sede/Procedimiento_ayuda/ZC01/Mod/Anexo_I_mod_otorg_prof_trib.pdf). If the supplier is a self-employed individual (*autónomo*), stamping is unnecessary.
2. A copy of signatory's fiscal ID (DNI/NIE or passport in the case of non-residents) if the agreement is not e-signed with a valid certificate.
These documents can be collected through a multi-step web form (*wizard*) which enabled through the *Supplier registration workflow* created during [VERI\*FACTU Invoicing setup](/guides/countries/es-verifactu).
1. **Register supplier** will generate a unique URL and add it into a `url` key value within the `meta` property. You would add a webhook after this step to notify the supplier.
2. **Set State to Processing** labels the silo entry so you know it's in process of registration.
3. **Wait for supplier registration** waits for the supplier to upload the required documents (signed agreement and ID). The supplier will be entitled to issue invoices through VERI\*FACTU immediately after the documents are uploaded.
4. **Set State to Registered** labels the silo entry so you know registration is complete.
5. **Wait for supplier approval** In live environments, Invopop will review the documents provided by the supplier in less than 72 hours. In sandbox, you can configure the workflow step to accept or reject providers. Open rejection the workflow will error with a `KO` and the reason for rejection can be reviewed in the Supplier or in the executed job. The supplier's invoice issuing entitlement will be revoked immediately.
In sandbox "Wait for supplier approval" can be configured to accept or reject suppliers. Re-running the workflow will not change the approval outcome, the supplier must be unregistered first.
## Register a Supplier
Suppliers need to provide the following documents for Invopop to issue invoices on their behalf:
1. A signed [direct representation agreement](https://sede.agenciatributaria.gob.es/static_files/Sede/Procedimiento_ayuda/ZC01/Mod/Anexo_I_mod_otorg_prof_trib.pdf). If the supplier is a self-employed individual (*autónomo*), stamping is unnecessary.
2. A copy of signatory's fiscal ID (DNI/NIE or passport in the case of non-residents) if the agreement is not e-signed with a valid certificate.
These documents can be collected through a multi-step web form (*wizard*) which enabled through the *Supplier registration workflow* created during [VERI\*FACTU Invoicing setup](/guides/countries/es-verifactu).
 If you have special needs regarding the onboarding of suppliers for VERI\*FACTU (such as using third party identity verification services), it's possible to implement your own onboarding process through the API. The process would be the following:
### Onboard suppliers through the API
[Create entry](https://docs.invopop.com/api-ref/silo/entries/create-an-entry-put)
If you have special needs regarding the onboarding of suppliers for VERI\*FACTU (such as using third party identity verification services), it's possible to implement your own onboarding process through the API. The process would be the following:
### Onboard suppliers through the API
[Create entry](https://docs.invopop.com/api-ref/silo/entries/create-an-entry-put)
`/silo/v1/entries/{id}`
Besides the supplier's basic information, the entry should contain a `people` object containing a [person](https://docs.gobl.org/draft-0/org/person) who will act as the legal representative of the supplier.
[Create a job](/api-ref/transform/jobs/create-a-job-put)
`https://api.invopop.com/transform/v1/jobs/{id}`
The same workflow is used for API onboarding
[Generate agreement PDF](/api-ref/apps/verifactu/agreement-fetch)
`apps/verifactu/v1/entry/:silo_entry_id/agreement`
The agreement file will be created with the supplier's data.
[Upload agreement PDF](/api-ref/apps/verifactu/agreement-upload)
`apps/verifactu/v1/entry/:silo_entry_id/agreement`
Upload the agreement into the supplier's silo entry.
[Upload identity images](/api-ref/apps/verifactu/identity-upload)
`apps/verifactu/v1/entry/:silo_entry_id/identity`
Upload the ID into the supplier's silo entry (can be DNI, NIE or Passport).
[Confirm](/api-ref/apps/verifactu/confirm) `https://api.invopop.com/apps/verifactu/v1/entry/:silo_entry_id/confirm`
Call this endpoint to confirm that everything has been prepared correctly and the supplier is ready to start operating.
Whether you issue invoices on behalf of third parties ([white label](/guides/use-cases/white-label)) or under your own name, the process is essentially the same. However, we divide the use case here for clarity:
Use the [Create an entry](/api-ref/silo/entries/create-an-entry-put) endpoint to upload a new supplier. Include a [party](https://docs.gobl.org/draft-0/org/party) (you can copy the example below) object in the [data](/api-ref/silo/entries/create-an-entry-put#body-data) field. The following fields are required:
* `name`
* `tax_id`
* `address`
* `email`
```json VeriFactu supplier example theme={"system"}
{
"$schema": "https://gobl.org/draft-0/org/party",
"name": "Invopop S.L.",
"tax_id": {
"country": "ES",
"code": "B85905495"
},
"addresses": [
{
"num": "42",
"street": "Calle Pradillo",
"locality": "Madrid",
"region": "Madrid",
"code": "28002",
"country": "ES"
}
],
"emails": [
{
"addr": "billing@example.com"
}
]
}
```
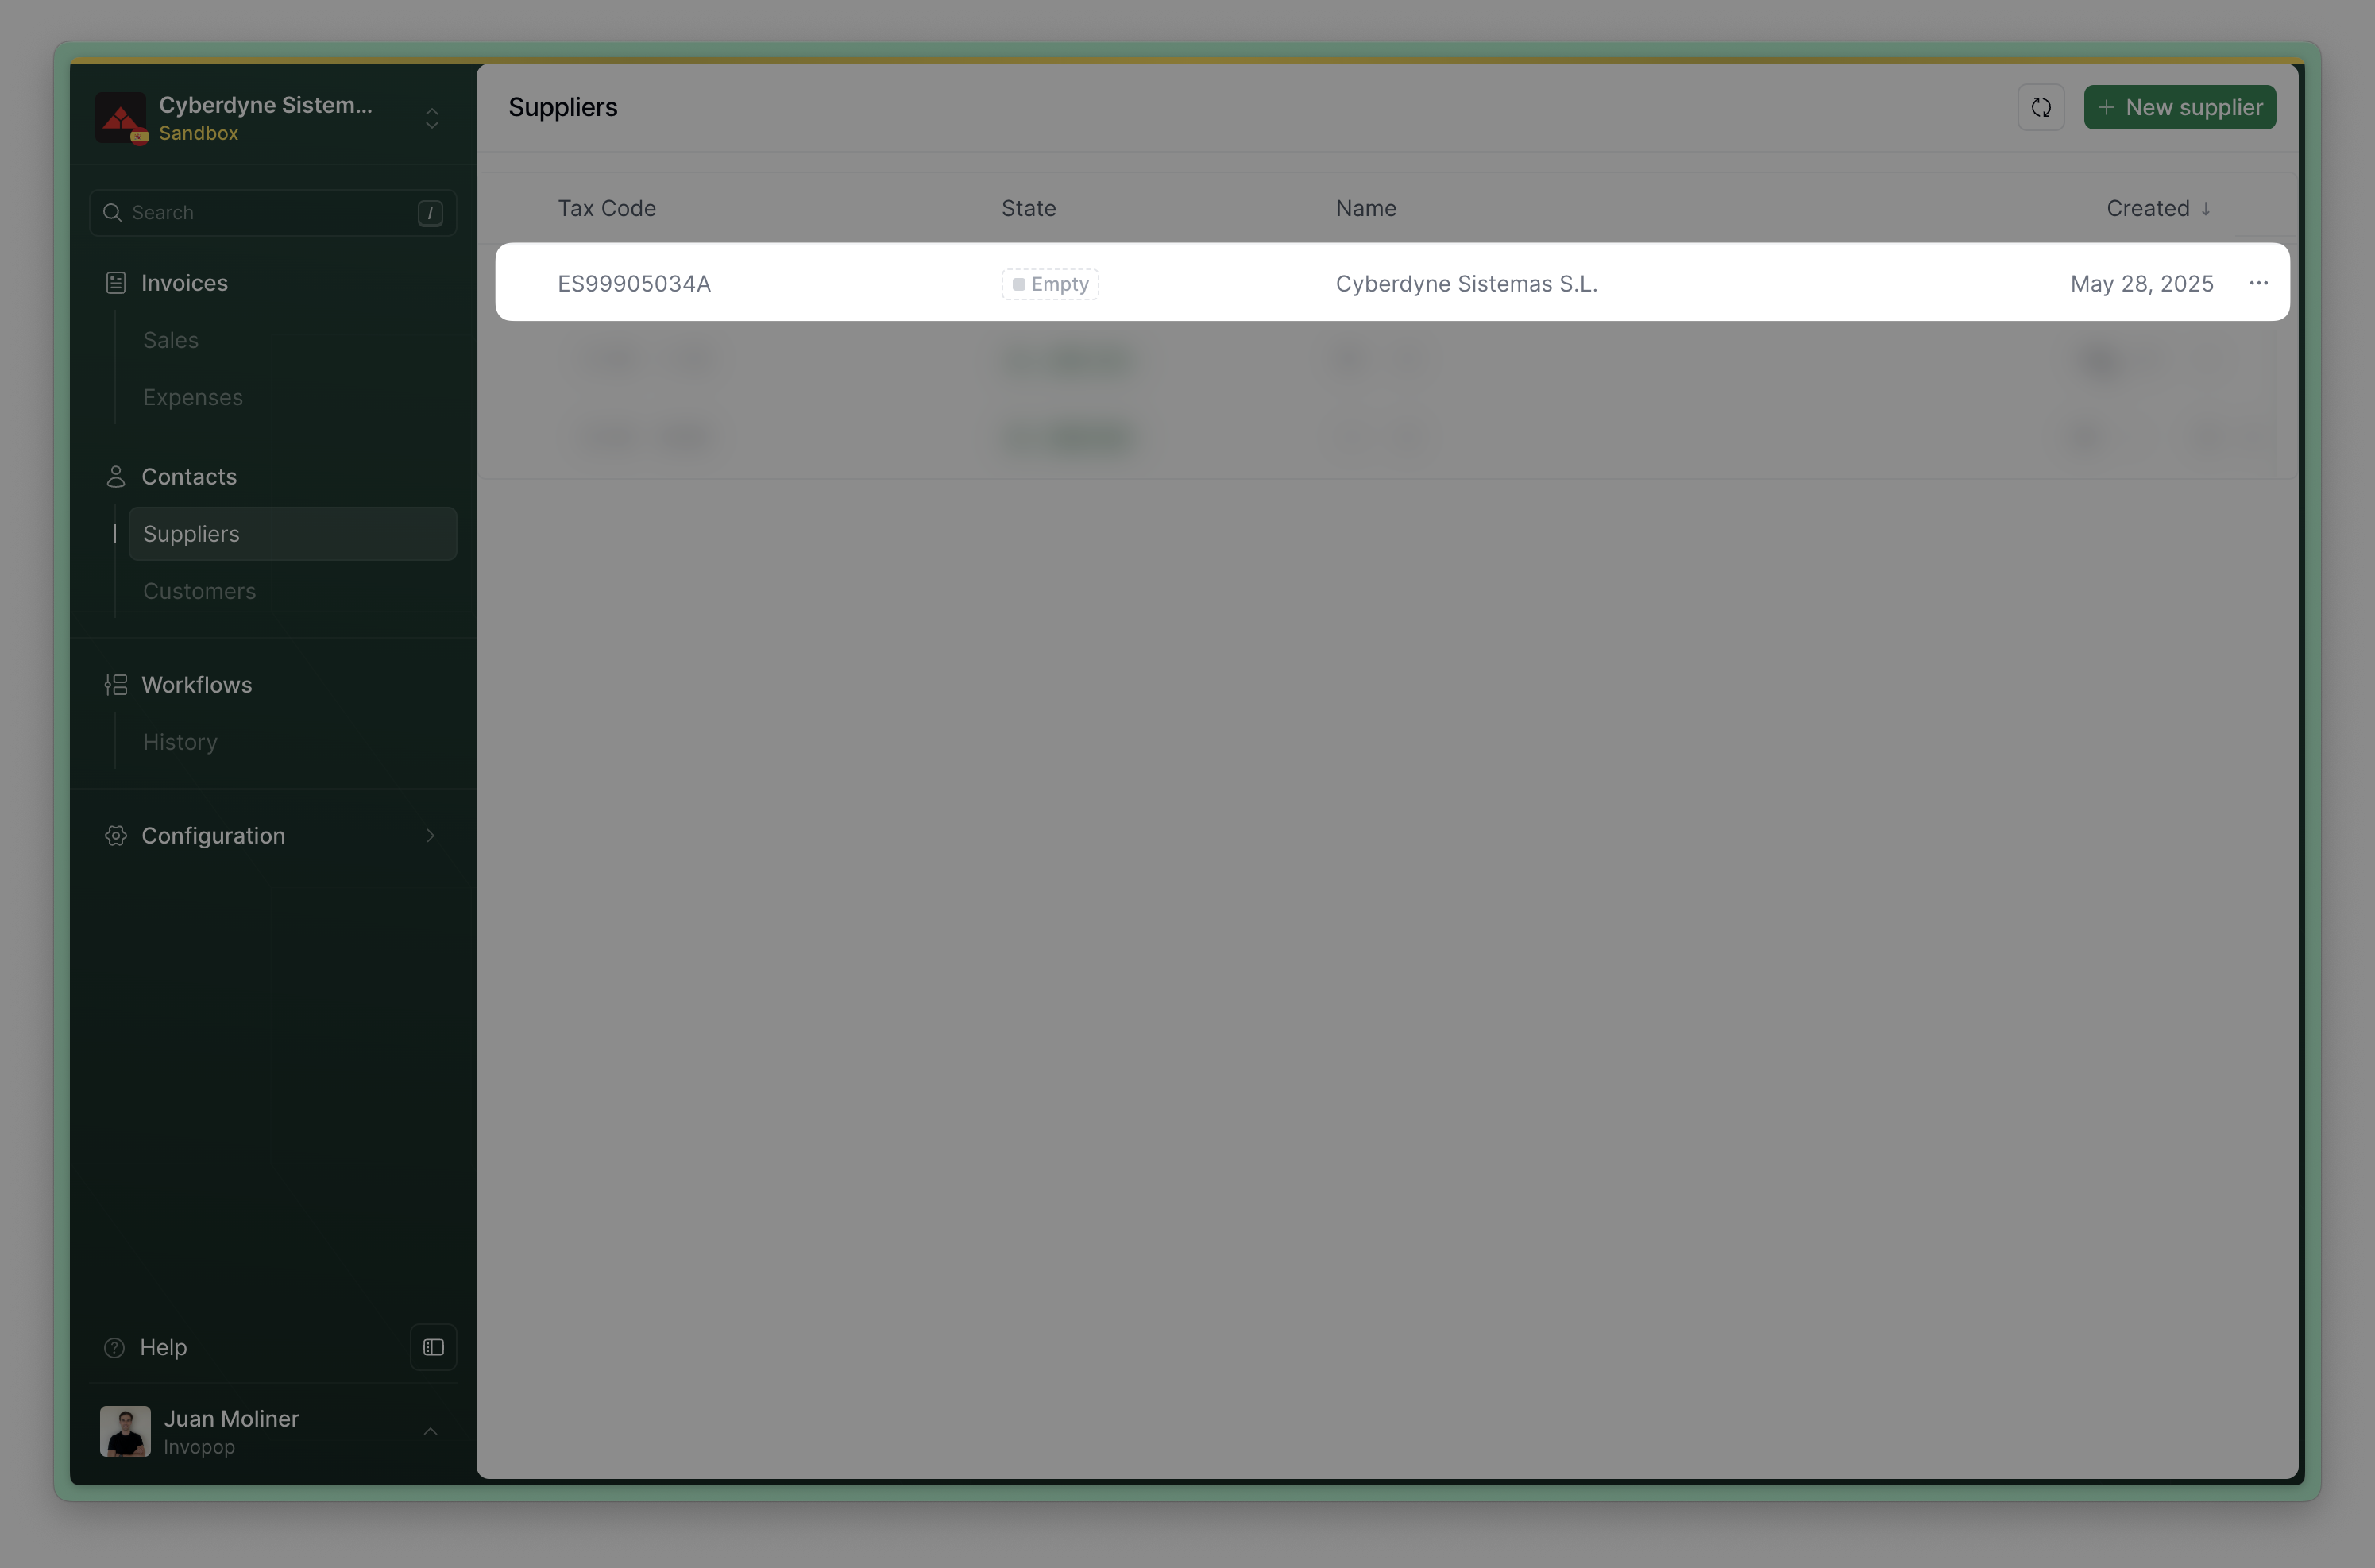
You should see the supplier in the **Contacts** section with status `Empty` after creating the entry.
 **With the API**: Send the supplier to the registration workflow using the [Create a job](/api-ref/transform/jobs/create-a-job-post) endpoint. Use:
* The `Silo Entry ID` of the supplier you uploaded on the previous step
* The Supplier Registration `Workflow ID` from the [Setup](##setup) section
**Through the Console**: Locate the recently created supplier in the **Contacts** section and tap on "Select Workflow". From the side panel, select the **VERI\*FACTU supplier registration workflow** you created in the [Setup](##setup) section.
***
The supplier's status will change to `Processing` while waiting for supplier registration and verification. Once these steps are completed successfully, the supplier's status will change to `Registered`. If not successful because the supplier did not complete the process or their documentation was rejected, the status will change to `Error`, and you can inspect the job history of this document to see the reason.
**With the API**: Send the supplier to the registration workflow using the [Create a job](/api-ref/transform/jobs/create-a-job-post) endpoint. Use:
* The `Silo Entry ID` of the supplier you uploaded on the previous step
* The Supplier Registration `Workflow ID` from the [Setup](##setup) section
**Through the Console**: Locate the recently created supplier in the **Contacts** section and tap on "Select Workflow". From the side panel, select the **VERI\*FACTU supplier registration workflow** you created in the [Setup](##setup) section.
***
The supplier's status will change to `Processing` while waiting for supplier registration and verification. Once these steps are completed successfully, the supplier's status will change to `Registered`. If not successful because the supplier did not complete the process or their documentation was rejected, the status will change to `Error`, and you can inspect the job history of this document to see the reason.
 If a supplier's agreement documentation is rejected and you need to onboard them again, follow the instructions in [what happens if a supplier validation is rejected](/guides/countries/es-verifactu#what-happens-if-a-supplier-validation-is-rejected)
If you need to unregister an entity (because the supplier is no longer your client, for example), use the following workflow template:
This workflow will revoke invoice issuing privileges for a VERI\*FACTU supplier.
Copy and paste into a new [Empty Party workflow](https://console.invopop.com/redirect/workflows/new?template=empty-invoice) code view.
```json Example VERI/*FACTU supplier registration theme={"system"}
{
"name": "VERI*FACTU unregister supplier",
"description": "Revokes invoice issuing entitlement for a VERI*FACTU supplier.",
"schema": "org/party",
"steps": [
{
"id": "8a613610-67ba-11f0-bcaf-170efff782a9",
"name": "Unregister supplier",
"provider": "verifactu.unregister"
},
{
"id": "96a6b0d0-67ba-11f0-bcaf-170efff782a9",
"name": "Set State",
"provider": "silo.state",
"summary": "Set state to `void`{.state .void}",
"config": {
"state": "void"
}
}
],
"rescue": [
{
"id": "e8d2a6b0-67bb-11f0-bcaf-170efff782a9",
"name": "Set State",
"provider": "silo.state",
"summary": "Set state to `error`{.state .error}",
"config": {
"state": "error"
}
}
]
}
```
In [Console](https://console.invopop.com) create a new workflow and select [Empty Party workflow](https://console.invopop.com/redirect/workflows/new?template=empty-invoice) in the template selector, then add the following steps:
1. **Unregister supplier** - Revokes invoice issuing authorization by the AEAT.
2. **Set State** - Select `void` to label the supplier accordingly.
In the Error Handling section, add the **Set State** action and select `Error`.
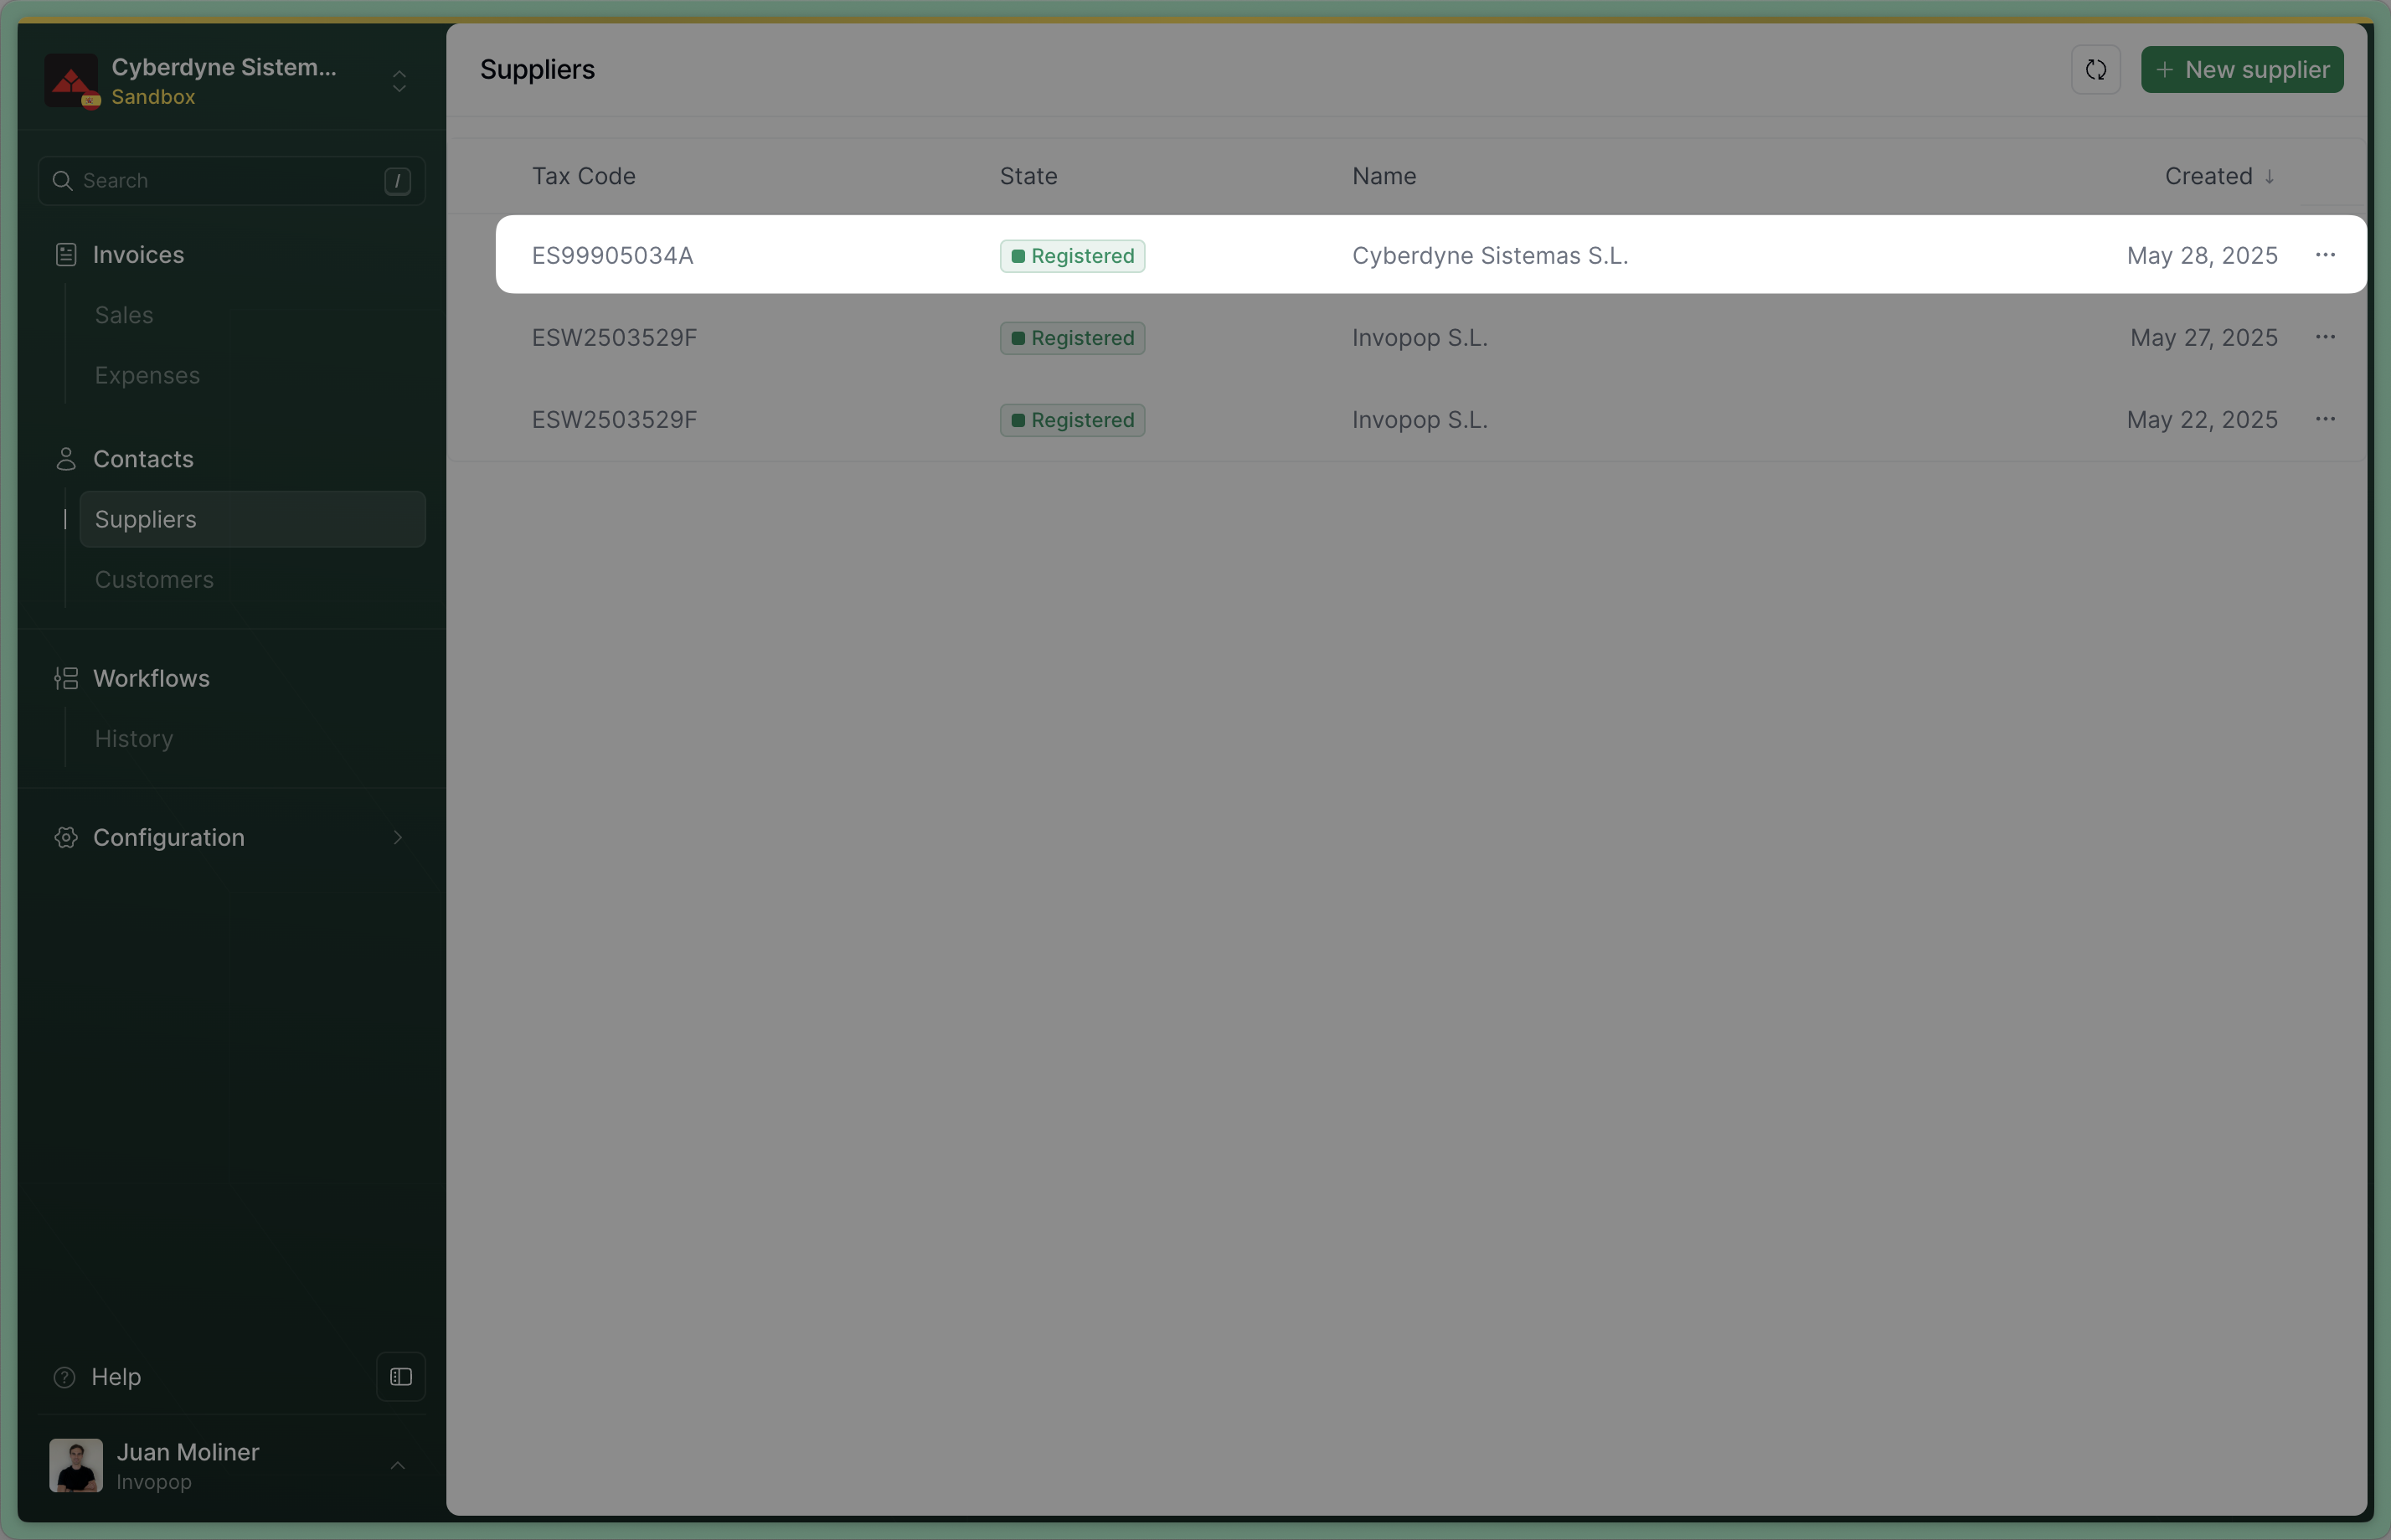
We will set up your company as a supplier within Invopop so that we can register it for issuing VERI\*FACTU invoices. First, click on **Suppliers** on the left sidebar and click on the **New Supplier** button at the top right corner of the screen:
We suggest that you copy and modify our example supplier to your own information, then you can paste it into the editor in **Code View**. Then switch to **Form view** as indicated in the screenshot, this will build and validate the silo entry and, if there are no errors, you'll be able to save your company's information as a Silo Entry.
```json VeriFactu supplier example theme={"system"}
{
"$schema": "https://gobl.org/draft-0/org/party",
"name": "Invopop S.L.",
"tax_id": {
"country": "ES",
"code": "B85905495"
},
"addresses": [
{
"num": "42",
"street": "Calle Pradillo",
"locality": "Madrid",
"region": "Madrid",
"code": "28002",
"country": "ES"
}
],
"emails": [
{
"addr": "billing@example.com"
}
]
}
```
After saving, you'll see your company in the **Suppliers** section with status `Empty`.
Locate your company in the **Suppliers** section and tap on "Select Workflow". From the side panel, select the **VERI\*FACTU supplier registration workflow** you created in the [Setup](##setup) section.
The status will change to `Processing` while waiting for you to upload the required documents. As soon as the documents are uploaded, the state will change to `registered` and it will be possible to issue VERI\*FACTU invoices. However, in the rare case we detect a problem with the documentation provided, we will revoke it and you must follow the instructions in [what happens if a supplier validation is rejected](/guides/countries/es-verifactu#what-happens-if-a-supplier-validation-is-rejected).
## FAQ
A KO will be triggered and the supplier will be labelled with the `Error` state. We currently recommend sending a reminder to the supplier through a webhook.
The registration link will not expire and the entity will still be able to upload their registration documents which will be validated. Should you choose to run this workflow again using this supplier, the supplier will be accepted or rejected immediately because the required documentation has already been provided and validated.
If the uploaded agreement documents were rejected, a KO will be triggered and the supplier will be labelled with the `Error` state. We currently recommend sending a notification to the supplier through a webhook within the **Error Handling** section.
Afterwards, if you wish to re-register the supplier with new documents, you must:
1. Unregister the supplier using the [Unregister Supplier workflow](/guides/countries/es-verifactu#template-3).
2. Re-run the Register supplier workflow.
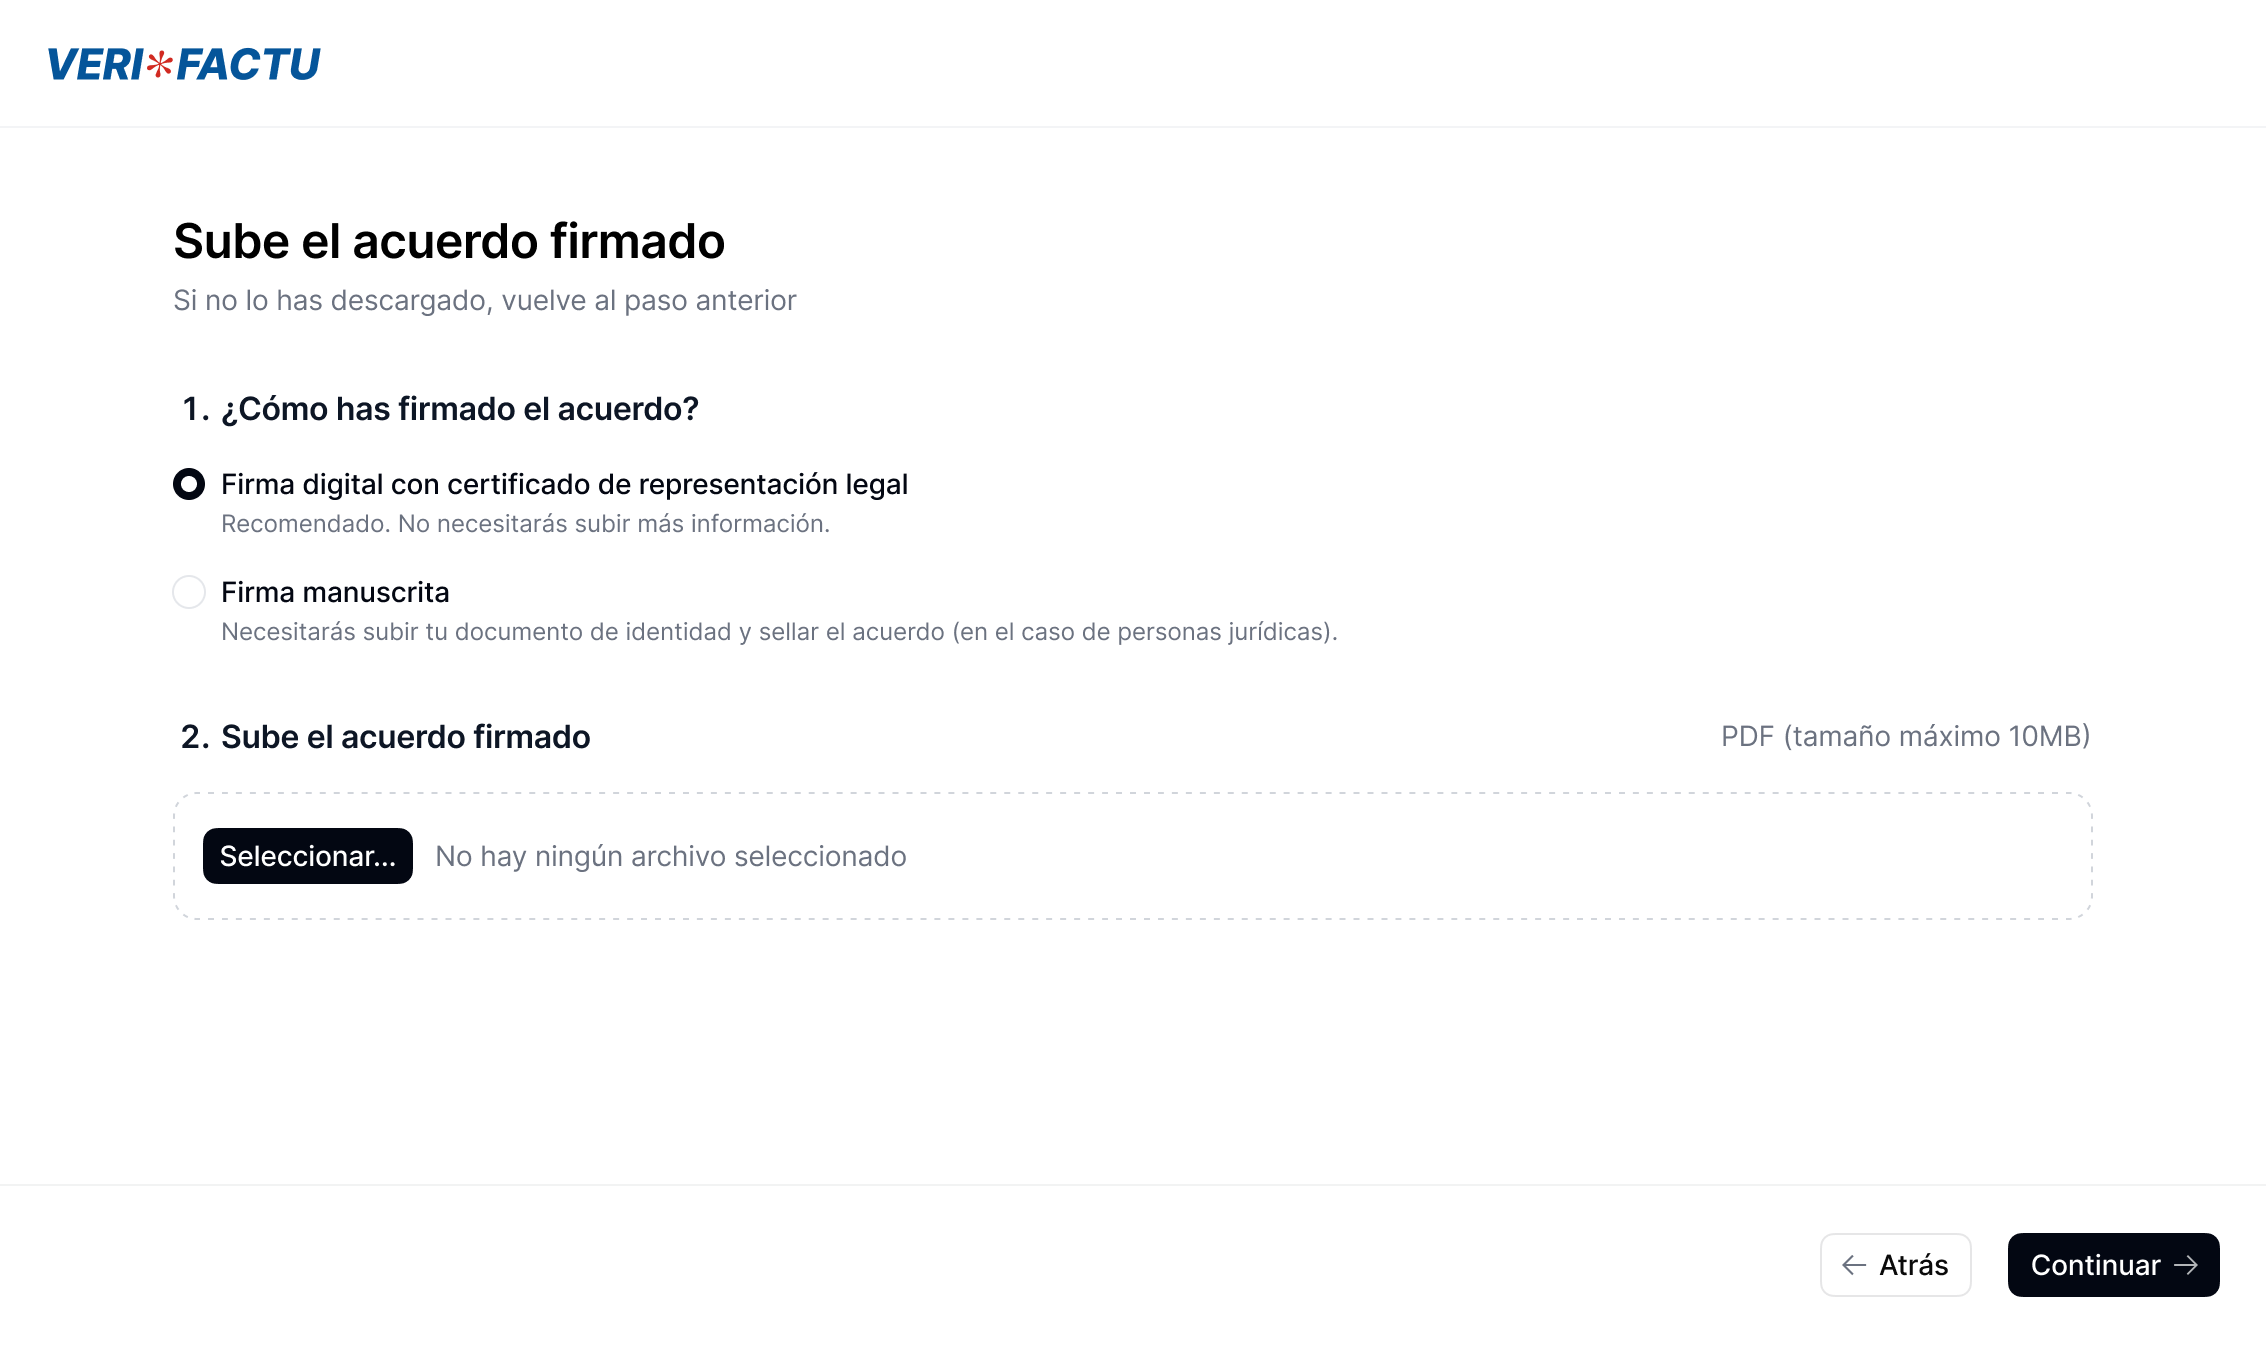
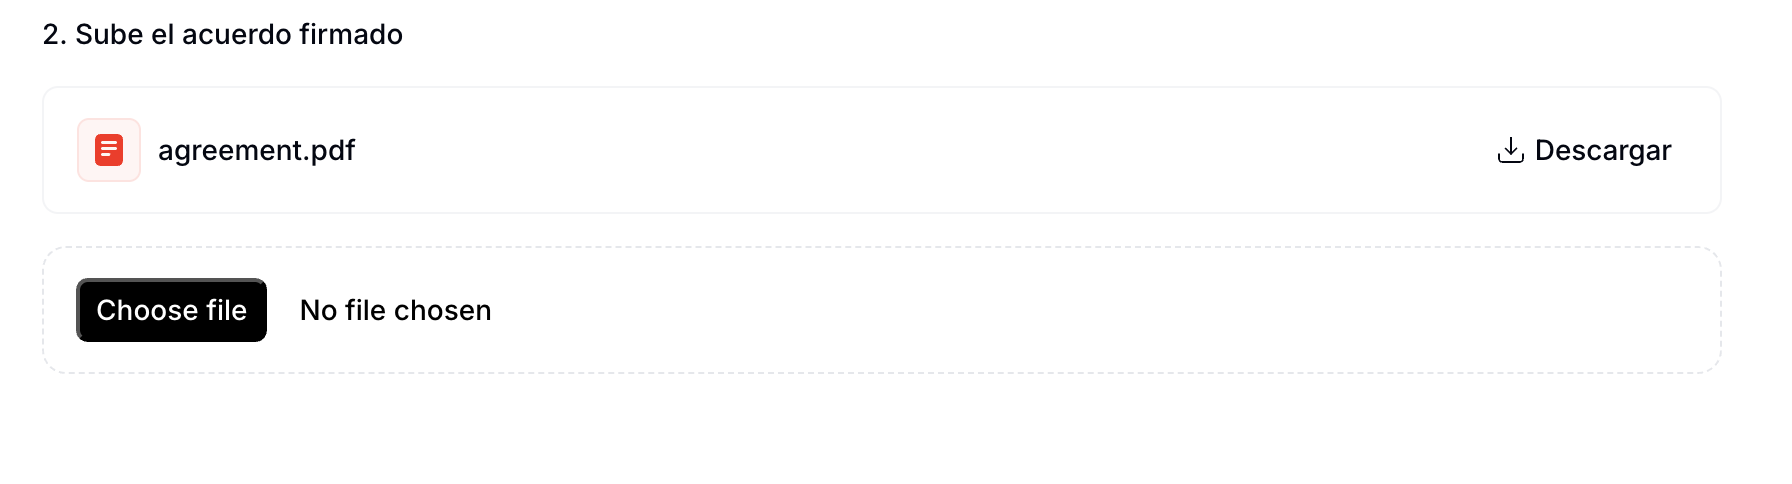
This will restart the entire registration process. When uploading documents, the previously submitted agreement will appear selected by default. Simply choose a new file and click `Continue` to override the old one. See the image below for reference:
If a supplier's agreement documentation is rejected and you need to onboard them again, follow the instructions in [what happens if a supplier validation is rejected](/guides/countries/es-verifactu#what-happens-if-a-supplier-validation-is-rejected)
If you need to unregister an entity (because the supplier is no longer your client, for example), use the following workflow template:
This workflow will revoke invoice issuing privileges for a VERI\*FACTU supplier.
Copy and paste into a new [Empty Party workflow](https://console.invopop.com/redirect/workflows/new?template=empty-invoice) code view.
```json Example VERI/*FACTU supplier registration theme={"system"}
{
"name": "VERI*FACTU unregister supplier",
"description": "Revokes invoice issuing entitlement for a VERI*FACTU supplier.",
"schema": "org/party",
"steps": [
{
"id": "8a613610-67ba-11f0-bcaf-170efff782a9",
"name": "Unregister supplier",
"provider": "verifactu.unregister"
},
{
"id": "96a6b0d0-67ba-11f0-bcaf-170efff782a9",
"name": "Set State",
"provider": "silo.state",
"summary": "Set state to `void`{.state .void}",
"config": {
"state": "void"
}
}
],
"rescue": [
{
"id": "e8d2a6b0-67bb-11f0-bcaf-170efff782a9",
"name": "Set State",
"provider": "silo.state",
"summary": "Set state to `error`{.state .error}",
"config": {
"state": "error"
}
}
]
}
```
In [Console](https://console.invopop.com) create a new workflow and select [Empty Party workflow](https://console.invopop.com/redirect/workflows/new?template=empty-invoice) in the template selector, then add the following steps:
1. **Unregister supplier** - Revokes invoice issuing authorization by the AEAT.
2. **Set State** - Select `void` to label the supplier accordingly.
In the Error Handling section, add the **Set State** action and select `Error`.
We will set up your company as a supplier within Invopop so that we can register it for issuing VERI\*FACTU invoices. First, click on **Suppliers** on the left sidebar and click on the **New Supplier** button at the top right corner of the screen:
We suggest that you copy and modify our example supplier to your own information, then you can paste it into the editor in **Code View**. Then switch to **Form view** as indicated in the screenshot, this will build and validate the silo entry and, if there are no errors, you'll be able to save your company's information as a Silo Entry.
```json VeriFactu supplier example theme={"system"}
{
"$schema": "https://gobl.org/draft-0/org/party",
"name": "Invopop S.L.",
"tax_id": {
"country": "ES",
"code": "B85905495"
},
"addresses": [
{
"num": "42",
"street": "Calle Pradillo",
"locality": "Madrid",
"region": "Madrid",
"code": "28002",
"country": "ES"
}
],
"emails": [
{
"addr": "billing@example.com"
}
]
}
```
After saving, you'll see your company in the **Suppliers** section with status `Empty`.
Locate your company in the **Suppliers** section and tap on "Select Workflow". From the side panel, select the **VERI\*FACTU supplier registration workflow** you created in the [Setup](##setup) section.
The status will change to `Processing` while waiting for you to upload the required documents. As soon as the documents are uploaded, the state will change to `registered` and it will be possible to issue VERI\*FACTU invoices. However, in the rare case we detect a problem with the documentation provided, we will revoke it and you must follow the instructions in [what happens if a supplier validation is rejected](/guides/countries/es-verifactu#what-happens-if-a-supplier-validation-is-rejected).
## FAQ
A KO will be triggered and the supplier will be labelled with the `Error` state. We currently recommend sending a reminder to the supplier through a webhook.
The registration link will not expire and the entity will still be able to upload their registration documents which will be validated. Should you choose to run this workflow again using this supplier, the supplier will be accepted or rejected immediately because the required documentation has already been provided and validated.
If the uploaded agreement documents were rejected, a KO will be triggered and the supplier will be labelled with the `Error` state. We currently recommend sending a notification to the supplier through a webhook within the **Error Handling** section.
Afterwards, if you wish to re-register the supplier with new documents, you must:
1. Unregister the supplier using the [Unregister Supplier workflow](/guides/countries/es-verifactu#template-3).
2. Re-run the Register supplier workflow.
This will restart the entire registration process. When uploading documents, the previously submitted agreement will appear selected by default. Simply choose a new file and click `Continue` to override the old one. See the image below for reference:
 In order to complete the representation agreement you will need to provide the following information:
#### Company
1. Name
2. CIF
3. Address
#### Legal representative
1. Full name
2. Government ID type and number
3. Address
If the entity is an self-employed individual (*autónomo*), only the information requested in in the **Legal representative** section is required.
The supplier can add their electronic signature to the PDF document ([instructions](https://helpx.adobe.com/acrobat/using/signing-pdfs.html)), or sign with a handwritten signature (we recommend using [Adobe's online service](https://www.adobe.com/acrobat/online/sign-pdf.html).
Individual documents are limited to a maximum size of 10MB. Uploads exceeding this size will result in an error.
In order to complete the representation agreement you will need to provide the following information:
#### Company
1. Name
2. CIF
3. Address
#### Legal representative
1. Full name
2. Government ID type and number
3. Address
If the entity is an self-employed individual (*autónomo*), only the information requested in in the **Legal representative** section is required.
The supplier can add their electronic signature to the PDF document ([instructions](https://helpx.adobe.com/acrobat/using/signing-pdfs.html)), or sign with a handwritten signature (we recommend using [Adobe's online service](https://www.adobe.com/acrobat/online/sign-pdf.html).
Individual documents are limited to a maximum size of 10MB. Uploads exceeding this size will result in an error.